
Living in a rental doesn’t mean you have to sacrifice style or organization. With the right approach, you can create a personalized closet that reflects your unique aesthetic, no tools or permit needed! This simple guide will show you how to make DIY closet dividers that are perfect for any apartment, whether you’re a student, a young professional, or a family seeking a bit more order. Say goodbye to clutter and hello to an organized haven tailored to your needs! These dividers not only keep your clothes neatly arranged but also add an artistic flair that transforms your closet into a part of your home decor. With affordable materials and creative designs, you’ll find this project not only enhances your closet space but also makes for a fun and satisfying DIY experience.
Designing Your Dream Dividers
Creating custom closet dividers can transform a cluttered space into a well-organized haven. Materials play a critical role in blending both style and functionality. Selecting the right one is your first step towards designing your dream dividers.
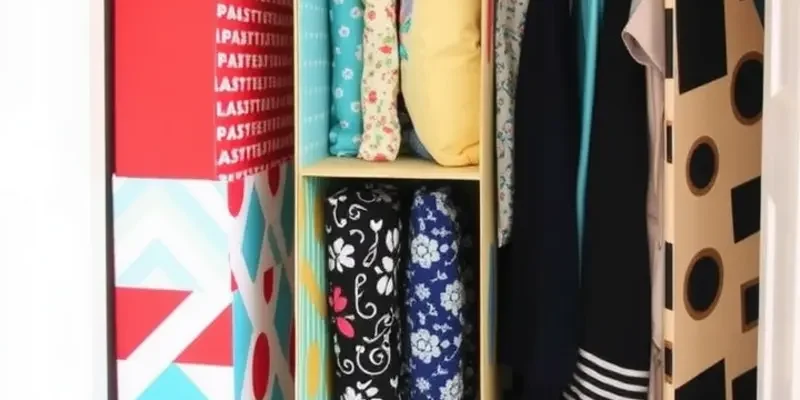
Cardboard is an excellent starting point for those seeking an affordable option. Not only is it lightweight, but it’s also easily cut into various shapes. To prevent it from bending or tearing, consider reinforcing it with multiple layers. Once constructed, unleash your creativity by painting the surfaces in vibrant colors or minimalist tones, aligning with your existing decor. Geometric patterns add a modern touch, easily achievable using masking tape and contrasting paints.
Fabric is another versatile material, perfect for introducing texture and warmth. Use sturdy fabric like canvas or denim for longevity. You might opt for bold, patterned fabric swatches or neutral tones depending on your aesthetic. Creative folds and layering can add depth and visual interest, making functionality meet fashion seamlessly. If you’re interested in eco-friendly options, consider sourcing recycled materials or remnants from local craft stores.
For a more robust approach, consider wooden dividers. While this option requires basic woodworking skills and tools, the results are unmatched in durability and elegance. Choose lightweight woods like pine or cedar to avoid weighing down your closet. Once cut, sanding and staining will enhance the natural grain, or for a pop of color, opt for painted finishes. Wooden dividers can also double as storage fixtures for lightweight items or accessories, dominating both visual and functional aspects.
Recycling existing materials offers not only sustainable solutions but unique character. Old crates, pallets, or even large plastic containers can be repurposed creatively. Cut and shape these into dividers, providing a rustic appeal reminiscent of modern farmhouse trends. These materials can be paired with fabric or paper to balance out textures, adding a personalized narrative to your space.
While aesthetics are important, don’t forget to factor in utility. Dividers should fit seamlessly within your closet dimensions without hindering access or movement. Consider adjustable dividers if you anticipate changes in your storage needs. Their flexibility allows for modification as your wardrobe evolves.
Another crucial consideration is how dividers interact with other storage solutions within your closet. If you’re using baskets or boxes, ensure the dividers harmonize with these items, preventing any dissonance in your design scheme. For more tricks on maximizing small spaces, see ideas on apartment organization baskets.
As you design your custom dividers, lean into your style while being mindful of practicalities. Whether through the play of patterns, textures, or the sheer utility of their construction, your closet can become a unique reflection of your personal taste and organizational needs. With thoughtful planning, your dream dividers can transform your closet into both a functional and visually appealing retreat.
Step-by-Step Implementation
Creating your own closet dividers is not only a functional solution for organizing your space but also a chance to express your creativity. Follow these detailed steps to make your own personalized closet dividers effortlessly.
1. Gather Your Materials
Before beginning, ensure you have everything you need. For cardboard dividers, gather sturdy cardboard, a ruler, a pencil, and scissors or a utility knife. If you prefer fabric-covered dividers, add fabric, a glue gun, and fabric scissors to your list. Consider patterns or colors that reflect your style.
2. Measure and Mark
Start by measuring the height and width of your closet rod. This will help you decide the size of your dividers. Draw a vertical rectangle on the cardboard slightly larger than the rod’s diameter. Add an extra inch on each side for support and stability. Cut out this shape carefully.
3. Cut the Opening
Next, mark and cut out a small circular opening at the top of the rectangle to fit around your closet rod. This opening should be slightly larger than the rod itself to allow easy installation but not so large that the divider slips off when bumped.
4. Assemble the Structure
If you’re sticking with plain cardboard, ensure all edges are smooth by trimming any roughness. For added durability, consider wrapping the edges with washi tape or clear packing tape. If using fabric, cut pieces slightly larger than the cardboard. Use the glue gun to affix the fabric snugly around the cardboard, folding edges neatly to the back.
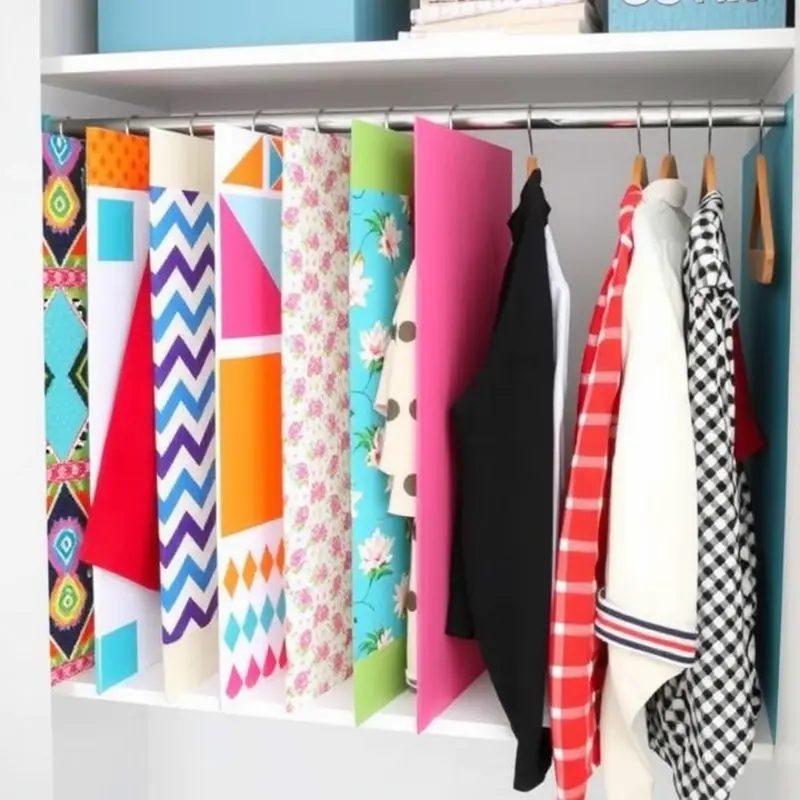
5. Decorate Your Dividers
Now comes the fun part—decorating your dividers. You can paint them, add stickers, or wrap them in decorative paper. For fabric-covered dividers, consider using patterned fabric or embellishing with ribbons and buttons. Your dividers should be a reflection of your personal aesthetic while also adding a splash of style to your closet.
6. Ensure Stability
To keep your dividers stable, it’s crucial to have the opening fit snugly on the rod. If a divider feels loose, add a small piece of adhesive putty or Velcro to the back to help it grip the rod better.
7. Install and Organize
Slide each completed divider onto your closet rod and position them according to your organizing plan—maybe by color, season, or type of clothing. Adjust as necessary to maintain balance and functionality.
By following these steps, you ensure both function and flair come to life in your closet system. A well-organized space can significantly enhance your daily routine. For more organizational ideas, explore our apartment organization baskets that complement DIY initiatives perfectly.
Final words
By crafting your very own closet dividers, you can seamlessly blend organization with personalization, making your rental space feel uniquely yours. Enjoy the process of selecting materials, dreaming up designs, and putting them together. Whether you create simple cardboard dividers or more elaborate fabric-covered pieces, each divider will not only improve the functionality of your closet but also reflect your style. Embrace this affordable DIY opportunity, turn your closet into an organized oasis, and make your rental truly feel like home.


