
Creating a personalized and organized space doesn’t have to involve expensive purchases or permanent changes, especially for renters. If you’re looking to enhance your living area with stylish and functional makeup organizers, you’ve come to the right place. From students to young professionals and families, everyone can benefit from creative organizational solutions that fit the constraints and possibilities of apartment living. Let’s explore how to craft beautiful makeup storage options that not only keep your essentials tidy but also reflect your unique style. With minimal materials and a little imagination, you can easily set up a system that’s both practical and delightful to use. Whether you’re a beauty enthusiast or simply want to make your morning routine smoother, these DIY projects will inspire you to level up your rental home in an affordable and visually appealing manner.
Upcycled Jars: Sustainable Beauty Storage
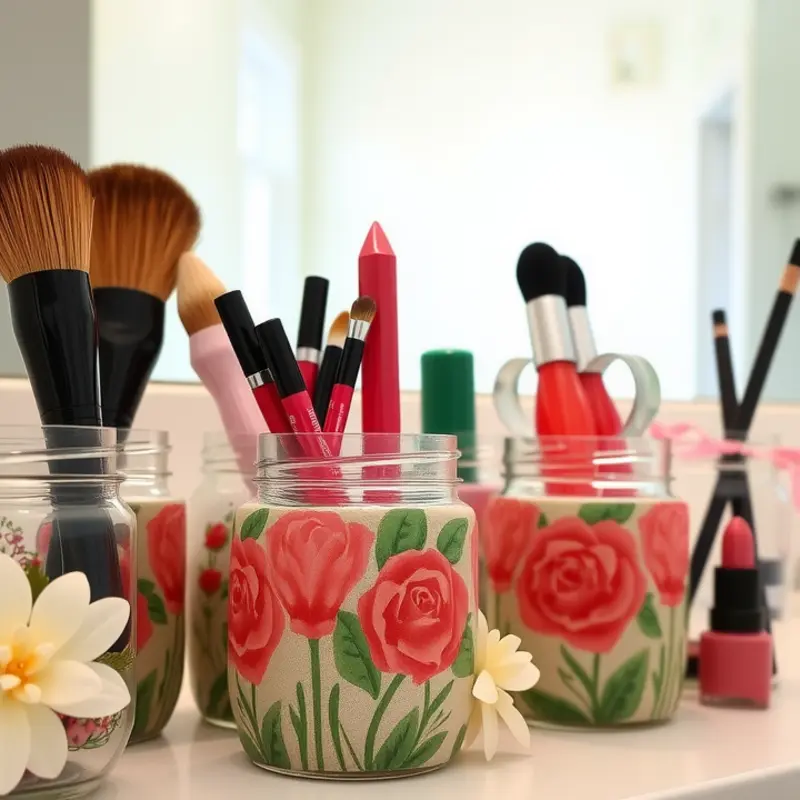
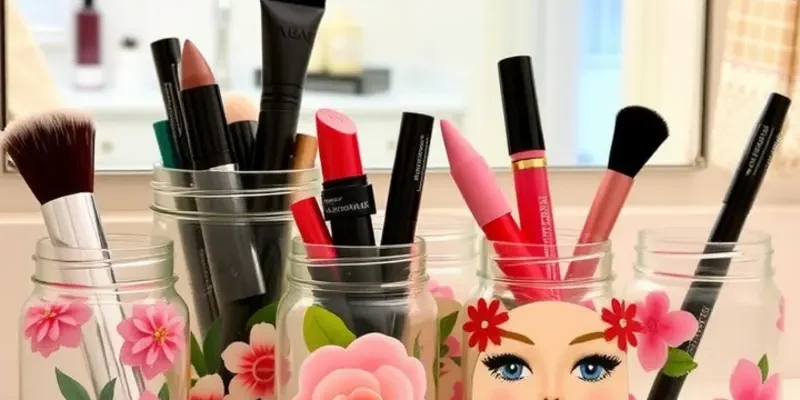
Repurposing everyday jars into elegant makeup storage not only adds a charming touch to your space but also champions sustainability. Glass and plastic jars often find their way into our homes, filled with various products. Instead of discarding them, you can give these containers a second life as chic makeup holders.
To begin crafting your customized organizers, first gather a assortment of jars. Prioritize clear glass jars for a luxurious feel, though plastic jars work too—especially with intricate designs. Clean each jar thoroughly, removing any labels or residue to achieve a smooth surface ready for transformation.
Materials and Tools
You’ll need some basic materials: jute twine, spray paint in your favorite color, or decorative fabric. Adhesive, such as a strong glue or a glue gun, is essential for affixing decorations, while scissors and a crafting knife aid in cutting materials to size.
Step-by-Step Guide
- Create a Cleansing Routine: Submerge the jars in warm soapy water to detach stubborn labels and remnants. Use an adhesive remover if necessary.
- Choose a Base Finish: Decide whether you’ll be spray painting, wrapping with fabric, or using both techniques. For spray paint, ensure you work in a well-ventilated area. Multiple thin coats yield the best results, drying 10 minutes between applications.
- Add Twine or Fabric: Wrap jute twine around the jar neck, securing it with glue. This adds a rustic charm. For a softer, upscale look, cut fabric strips to wrap around the jar, overlapping each layer slightly for texture.
- Embellish Your Design: Add baubles, such as pearls or rhinestones, to match your room’s aesthetic. This is the stage to express your individuality.
Crafting a Cohesive Look
To create a seamless look across multiple jars, choose a consistent color palette that mirrors the theme of your vanity area. Complementary jars do wonders in establishing order and elegance. Align your newly refurbished jars along your vanity or bathroom shelf, and you’ll witness an immediate transformation from clutter to showcase.
Not merely for aesthetics, these organizers introduce functionality. Begin with the larger jars for makeup brushes, then transition to medium and smaller jars for items such as eyeliners, lipsticks, and beauty blenders. This smart recycling idea is not just eco-friendly, but provides a structured beauty routine every morning.
Integrating these DIY strategies with other lifestyle adjustments enhances your apartment decor. Embrace the art of transformation by turning what was once considered disposable into something bespoke and unique. Through creative vision and deliberate crafting, your apartment’s personality will shine, all while keeping sustainability in mind.
Magnetic Makeup Board: A Space-Saving Marvel
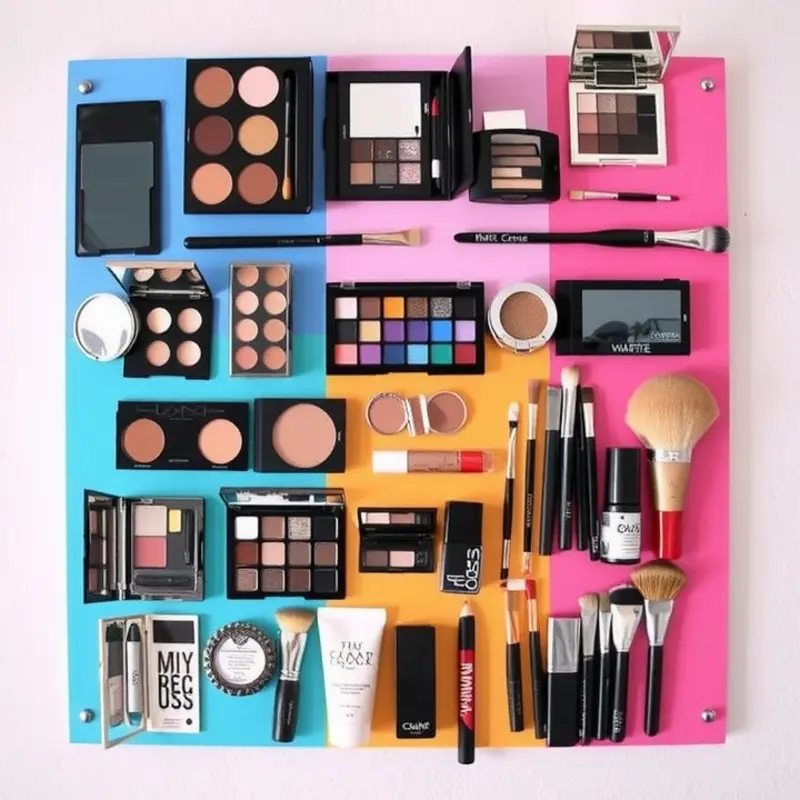
Imagine transforming your beauty routine into an artful display with a magnetic makeup board. This chic solution not only saves valuable counter space but also adds an innovative visual appeal to your apartment. Perfect for renters seeking both practicality and style, crafting your own magnetic makeup board is a rewarding project requiring minimal tools and cost.
Start with selecting a metal board that will form the canvas of your creation. Look for options with an aesthetic frame or consider adding your own border for a personal touch. Size matters, so ensure your board will comfortably fit both your wall and your collection without cluttering either. Remember, the goal is to enhance accessibility while maintaining a clutter-free environment.
Next, choose a color palette that complements your existing decor. A layer of bold chalk paint or subtle pastels can transform an ordinary metal sheet into a vibrant centerpiece. Be sure to use paint suited for metal surfaces to ensure longevity and professional finish. Once dry, your board will serve as both a functional accessory and a decorative focal point.
Now, turn your attention to magnetizing your makeup. For smaller items such as lipsticks or eyeliners, self-adhesive magnetic strips are ideal. These strips can be cut to size and applied directly to product packaging. Larger containers might require stronger magnets or small metal tins to secure them in place. Make sure the magnets are sturdy enough to hold your items without slipping.
Positioning is key, not only for aesthetic appeal but also for ease of use. Consider grouping items by category or color for a cohesive look. Use an arrangement that reflects your daily routine—frequently used items should be towards the center for quick access. This organization method ensures your mornings start smoothly, a welcome departure from rummaging through drawers.
To further personalize, incorporate decorative elements such as small mirrors or framed inspirational quotes. These additions draw the eye and provide motivation during your morning ritual. A touch of greenery, like a small hanging plant, can inject life and freshness into the display, balancing the metallic elements.
This DIY project marries creativity with function, turning a plain wall into a personalized beauty station. As you step back and admire your handiwork, take pride in having maximized your space with style. Discover more on enhancing your living areas with similar projects by exploring apartment-friendly closet hacks that complement your new makeup board perfectly.
Your magnetic makeup board not only declutters but also transforms your beauty products into a curated collection. Enjoy the ease of a streamlined routine and the satisfaction of a DIY project that truly upgrades your living experience.
Final words
Organizing your makeup in a rental space can be both practical and artistic. By using simple materials and a bit of imagination, you can create customized storage solutions that enhance your home while reflecting your personality. Whether you choose to upcycle jars or create a magnetic board, smart organizing can streamline your morning beauty routine and eliminate clutter. Your apartment doesn’t have to compromise style for functionality—these DIY makeup organizers prove that creativity and practicality can coalesce beautifully. Now it’s your turn; pick a project, gather your materials, and they’re only a few steps away from a beautifully organized space!


