
Adding plants to your living space not only brings life and color but also enhances your well-being. If you’re a creative renter, young professional, student, or part of a bustling family, personalizing your rental home can sometimes feel challenging. You want your space to reflect your personality while adhering to the sometimes rigid rules of your lease. Fortunately, DIY plant hangers offer a fun, affordable way to infuse style into your apartment without making permanent changes. Whether you’re working with limited space or looking for a distinctive touch that captivates the eye, these simple plant hangers can transform blank walls into vibrant displays of greenery. With this guide, you’ll find step-by-step instructions to create your own unique plant hangers, allowing you to embrace your creativity and add some leafy charm to your home. Get ready to hang your plants with pride and brighten your apartment with personality!
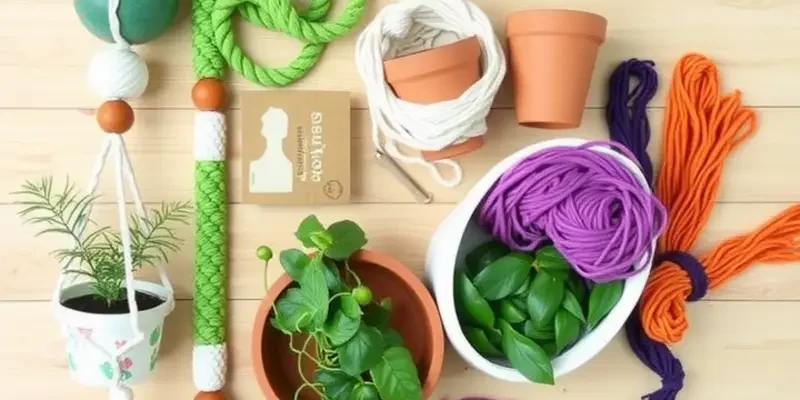
Materials and Tools for Your Plant Hanger Project
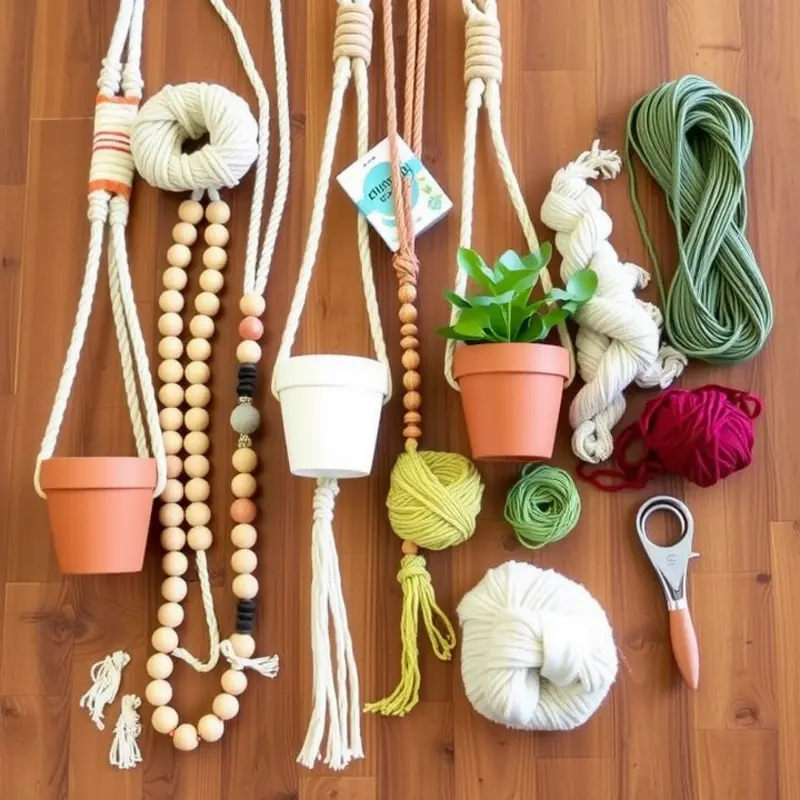
Starting a DIY plant hanger project begins with gathering the right materials and tools, setting the foundation for creativity. This chapter will guide you through a simple yet flexible list to suit various aesthetic preferences and styles.
Essential Materials
-
Rope or Twine: For the base of most plant hangers, natural materials like cotton, jute, or hemp work wonders. If you’re looking for a splash of color or to match existing decor, consider dyed ropes. They are sturdy and add a personal touch.
-
Metal Hoops: These offer structure and can create impressive geometric designs. Look for different shapes such as rings or squares to add an architectural element.
-
Wooden Beads: Add texture and dimension to your designs. Beads can be painted, stained, or left natural, depending on the desired look. Mix different sizes for visual interest.
-
Plant Pots: Choose pots that fit both your plant hanger design and plant size. Lightweight options like plastic or resin-glazed pots are ideal to prevent excessive hanging weight.
-
Hooks or Brackets: Ensure they can support the weight of your final plant hanger. Wall or ceiling hooks should be made of durable materials like stainless steel or brass.
Useful Tools
-
Scissors: A sharp pair is crucial for cutting rope cleanly. Optional fabric scissors might be easier for thicker materials.
-
Ruler or Measuring Tape: Accurate measurement leads to even, well-balanced hangers.
-
Glue Gun: Can be useful for securing knots or adding decorative elements like beads or tassels.
-
Drill (if applicable): Essential if you’re mounting hooks into walls or ceilings.
Creative Suggestions
Consider these suggestions to personalize your hangers further:
-
Macramé Patterns: Delving into macramé can be rewarding. From beginner-friendly knots to complex designs, these add elegance to your plant hangers.
-
Paint or Dyes: Customize the color of ropes or wooden beads. Match the hues to your room’s palette for harmonious integration.
-
Natural Elements: Integrate elements like shells, feathers, or crystals. They bring an organic feel and complement greenery beautifully.
-
Thematic Embellishments: Season or holiday themes (like autumn leaves or snowflakes) can give your hangers a festive touch.
Combining Functionality with Style
While crafting these hangers, consider not just aesthetics but also functionality. For instance, choose ropes strong enough for the intended plant pot weight. Equally, ensure pots have proper drainage if necessary, or line them appropriately to protect floors and surfaces.
Crafting a DIY plant hanger is an excellent way to inject personality and style into a rental space. With the right materials and tools, the possibilities are endless. When selecting your materials, balance practical considerations with your creative vision to produce hangers that not only support your plants but also enhance your living space’s overall charm. For more DIY decor ideas, consider exploring removable picture ledges, which pair well with your plant hangers. These small additions can make a significant impact in creating a personalized and inviting atmosphere.
Step-by-Step Guide to Creating Your Plant Hangers
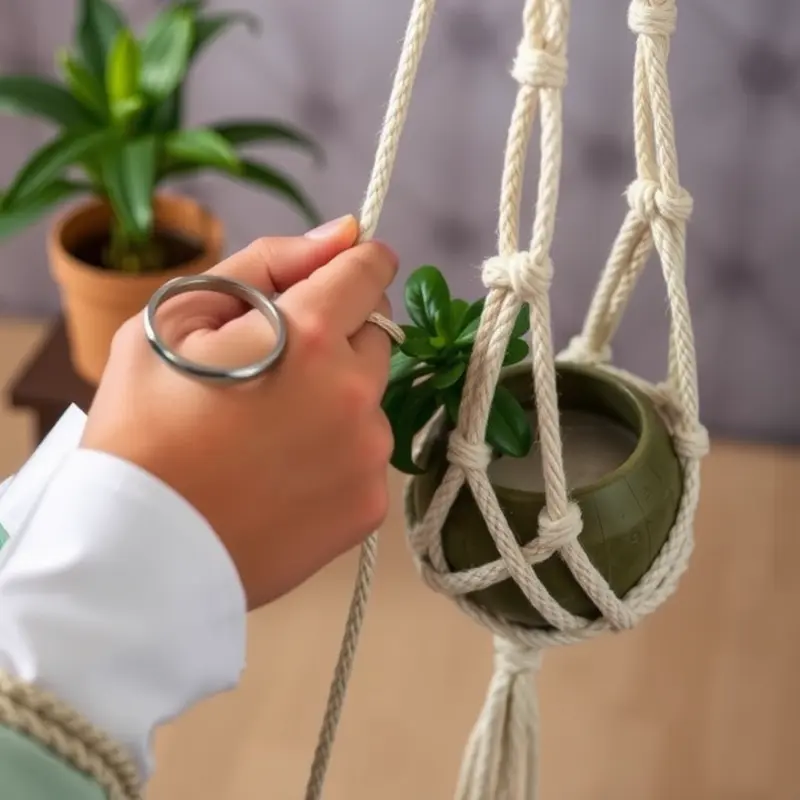
Let’s transform your space with personalized plant hangers that are as functional as they are beautiful. With your materials ready, we’ll explore a simple knot design and a more intricate macramé pattern. Each method allows for customization, so feel free to get creative!
Simple Knot Design
- Measure and Cut: Start by cutting four pieces of rope, approximately four times the length you want your hanger to be.
- Gather and Secure: Hold all the ropes together and make a large knot at one end. Ensure it’s tight, as this will support the weight of the plant.
- Create the Base: About six inches from the bottom knot, tie two ropes from adjacent pairs together. Repeat for the remaining pairs.
- Form the Sides: Divide the ropes and tie knots about five inches further up, combining one rope from each pair to create a net effect.
- Secure the Pot: Continue this process up the length of the ropes until you have a wide enough net to hold your planter. Finish with a large knot at the top.
This straightforward method is adjustable for any pot size and can easily be embellished with beads or other decorative elements.
Intricate Macramé Design
For those seeking a bit more challenge and flair, macramé is a great choice.
- Cut the Cord: You’ll need multiple cords, each about five times the desired length of the hanger.
- Attach to Ring: Fold each cord in half and attach them to a metal or wooden ring using a cow hitch knot. This method sets a strong foundation for the rest of your hanger.
- Start Knotting: Begin with square knots, taking a set of four cords at a time. Make sure to keep your spacing consistent.
- Add Spirals and Twists: Incorporate spiral knots for added texture. These can be made by repeating half the square knot continuously until a noticeable twist forms.
- Form the Basket Base: About halfway down, start creating alternating square knots to form the cradle for your plant.
- Finish Off: Complete the design with a series of tightly packed square knots. Gather all cords and tie a robust knot to secure everything in place.
Adding small touches such as different colored cords or natural elements can make your macramé even more unique.
Both methods offer a cost-effective way to enhance your living space without compromising style. Once you’ve mastered these, you might want to try your hand at creating a DIY removable picture ledge to complement your green space.
Injecting greenery into your home can turn a plain rental into a personalized retreat. Whether sticking with simplicity or exploring intricate details, your new plant hangers are sure to make a statement.
Final words
DIY plant hangers are a delightful and affordable way to bring greenery into your rented space while showcasing your creative side. With just a few materials and some basic crafting skills, you can turn a drab wall into an eye-catching display of plants. These hangers not only brighten your home but also make great conversation pieces and personal touches. So, gather your materials, invite some friends to join you, and create unique plant hangers that reflect your style. Every time you look at your flourishing plants, you’ll be reminded of the fun you had bringing them to life!


