
Everyone needs a place to sit and store belongings, especially in a rental where space can be tight. The DIY apartment storage ottoman is more than just a stylish fixture; it’s a game-changer for turning clutter into organized comfort. Perfect for creative renters, young professionals, students, and families, this versatile piece can be customized to fit your personal style and specific storage needs. Imagine an ottoman that not only enhances your decor but also functions as a hiding space for throws, books, toys, or whatever else you need to clear from sight. This project allows you to let your creativity shine while being budget-friendly, as we will walk through easy steps to construct an ottoman tailored just for you. Say goodbye to clutter and hello to chic storage solutions that reflect your unique flair!
Gathering Materials for Your Storage Ottoman
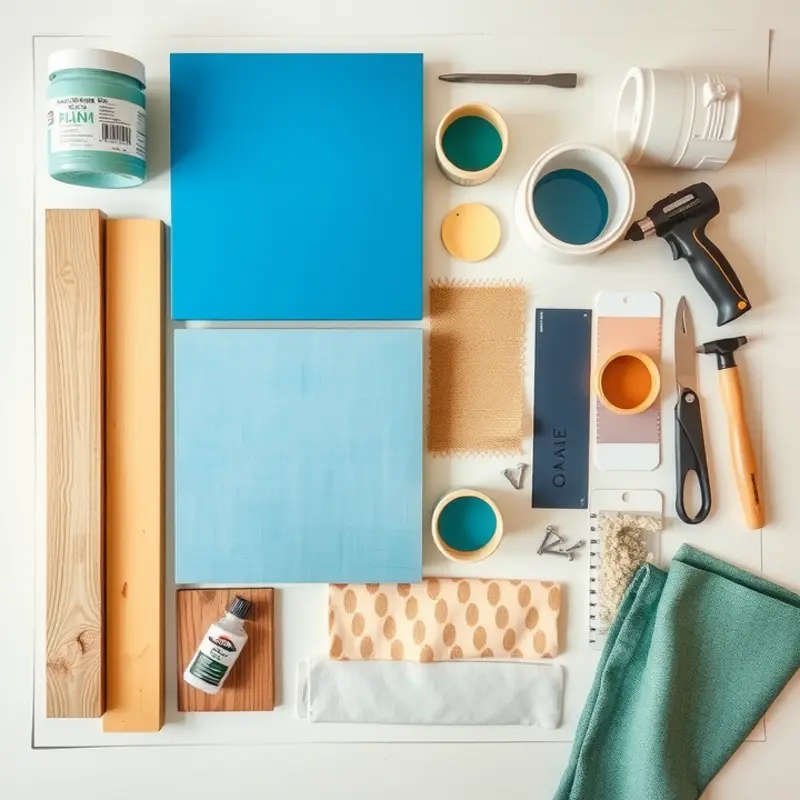
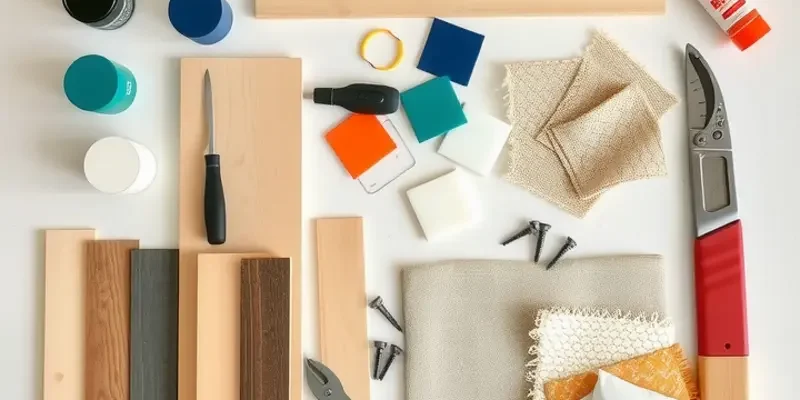
Creating a custom storage ottoman begins with gathering the right materials, each essential for both style and functionality. As you embark on this project, consider materials that not only fulfill a practical purpose but also enhance your home decor.
First, select a sturdy wooden board. This will form the base and structure of your ottoman. The dimensions depend on the size you envision. Ensure the board is thick enough to support weight without bending. Typically, a thickness of at least 1 inch is ideal. Check your local hardware store wood section for off-cuts that might be perfect for smaller projects and economical.
Next, choose foam padding or a cushion for comfortable seating. Dense foam ensures durability and retains shape over time. However, if you’re considering using the ottoman frequently, memory foam offers superior comfort. Depending on your budget, purchasing foam online can provide more varied options in terms of density and quality.
The choice of fabric is where style meets substance. Opt for upholstery fabric for its durability and wide range of colors and patterns. If you prefer something lighter, durable cotton with a robust weave can also suffice. Remember, your fabric not only sets the visual tone but also determines the maintenance level. Consider fabrics that are easy to clean, especially if you have pets or small children around.
To ensure a solid build, gather wood glue and screws. These are crucial for a secure assemblage, providing the necessary reinforcement to the structure. Don’t forget to also pick up hinges if you’re planning to make the ottoman’s lid movable for storage access. Robust hinges support both the weight of the lid and whatever you store within.
Enhance the visual appeal of your ottoman with paint or wood stains. This is particularly important if you opt for visible wooden elements. Choose a finish that complements the existing color palette of your room. If you’re unsure, neutral tones are safe bets that provide timeless appeal without overshadowing the rest of the decor.
You might also consider adding optional features like caster wheels for mobility, allowing you to easily reposition the ottoman as needed. Decorative trims or beading can be added to the fabric for an extra touch of sophistication. However, ensure that these additions don’t compromise the ottoman’s stability.
Finally, if you’re concerned about the functional harmony of your apartment and this new addition, ensure your ottoman does not clutter the space by reviewing apartment-friendly furniture tips here. This ensures it integrates seamlessly into your living area.
By thoughtfully selecting each material, you can create a DIY ottoman that is both stylish and functional, reflecting your unique tastes while serving a practical purpose in your home.
Assembling Your Custom Storage Ottoman
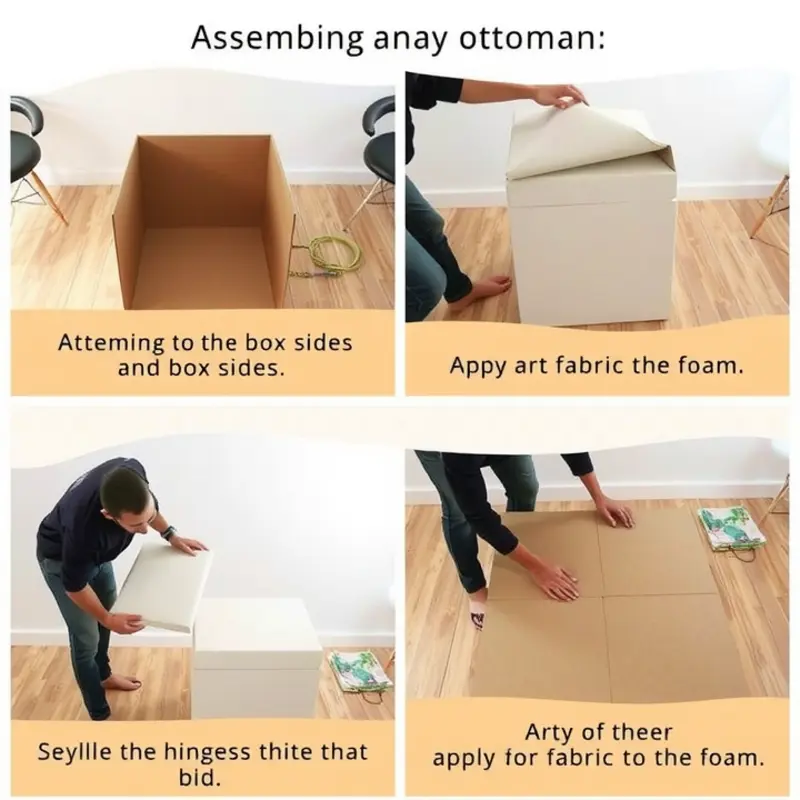
Now that you have all your materials ready, it’s time to assemble your DIY storage ottoman. This section provides a step-by-step guide to ensure a simplified yet robust build. Begin by cutting your wooden board into the desired dimensions. A 3-foot-sided box is typically ideal for both seating and storage purposes.
-
Assemble the Box: Attach the sides to the base using wood glue and screws. Ensure each joint is secure and aligns perfectly. To help, use clamps to hold the pieces in place as the glue dries. This approach ensures stability and durability, necessary for any furniture meant for regular use.
-
Add the Lid: Align the lid with the box and secure it with hinges. Opt for robust hinges to allow easy access to the storage inside. Test the lid movement to ensure it operates smoothly without creaking.
-
Foam It Up: Cut the foam to the size of the lid, ensuring it covers the entire top surface. Use spray adhesive to attach the foam firmly to the lid. Allow adequate time for the adhesive to dry to ensure the foam remains securely attached.
-
Dress It Up: Once the foam is securely fixed, wrap the fabric of your choice around it. Use a staple gun to attach it neatly to the underside of the lid. Make sure the fabric is taut to avoid any wrinkles or sagging, ensuring a polished and professional finish.
-
Final Touches: At this point, consider painting or staining the wooden edges for a refined look. Additionally, if your design includes wheels for mobility, now is the perfect time to attach them. Wheels not only add functionality but enhance the visual appeal of your creation.
Position your ottoman in the desired spot within your home. Fill it with your treasured items, from books to blankets, and admire your handiwork. This piece not only adds valuable storage but also serves as a charming focal point in your home.
For more ideas on personalizing your living space without permanent changes, consider exploring Apartment-Friendly Furniture Upgrades.
Final words
Completing your DIY apartment storage ottoman is not just about creating extra seating and storage; it’s about infusing your personal style into a functional piece of furniture. With affordable materials and a bit of creativity, you have crafted a piece that serves multiple purposes while enhancing your living space. Whether you’re storing books in a cozy nook, hiding toys in the living room, or simply enjoying a stylish place to rest your feet, your custom ottoman is sure to impress. So gather your materials, unleash your creativity, and enjoy the satisfaction of knowing you made something special for your home.


