
Living in a rental doesn’t have to mean sacrificing style or comfort. For creative renters, young professionals, students, and families, personalizing a space can not only boost your mood but also provide the privacy you crave. Enter the DIY privacy screen—an affordable, stylish solution that can easily elevate your rental home. Whether you need to separate your workspace from your living area, shield yourself from nosy neighbors, or create a cozy reading nook, privacy screens offer both function and flair. With a little creativity and some basic materials, you can transform blank walls or awkward corners into beautiful features that reflect your personal aesthetic. This guide will take you through imaginative ideas and practical steps to inspire your next DIY project. So roll up your sleeves and let’s dive into the world of personalizing your rental home!
Selecting Your Style: Finding the Right Privacy Screen Concept

Choosing the perfect design for your privacy screen involves a delicate balance of aesthetics, functionality, and the limitations of your rental space. Unlike homeowners, renters have unique constraints but also possess creative opportunities to transform their living quarters. The first step in the creative journey is to assess your personal style. Is your aesthetic more aligned with sleek modernism, or do you find comfort in the eclectic layers of bohemian design? This insight lays the foundation for your design choices.
Measuring your space is crucial. Privacy screens serve not only as aesthetic enhancements but also as spatial dividers. Determine the dimensions of the area where you’d like the screen to stand. A towering screen might overwhelm a small area, while a diminutive one could get lost in a larger space. Strategic placement can optimize both the function and visual appeal, transforming a monotonous corner into a captivating focal point.
Next, consider your material preferences. If your heart beats for modern elegance, you might lean towards materials like metal or glass, known for their clean lines and minimalist vibe. Alternatively, if you are drawn to rustic warmth, you might find appeal in distressed wood panels or woven textiles. Selecting the material also involves practical considerations. Consider the ease of installation and removal, as rental agreements often restrict permanent alterations.
For fabric-based screens, the choice of textiles presents a playground of possibilities. Strive for a harmonious blend of colors and patterns that echo the surrounding decor while introducing a fresh burst of personality. Opt for durable fabrics that stand up to daily wear and are resistant to fading, especially in sun-drenched rooms. A solid color can be soothing, while a bold pattern injects energy into an otherwise bland room.
Is your thumb green? If so, indoor plants can be an adventurous alternative. Utilizing climbing plants, such as ivy or philodendrons, to create a living screen adds a vibrant, sustainable touch to your decor. Not only do they enhance the room’s air quality, but their organic movement also introduces a unique dynamism as they grow and change shape over time.
Balancing functionality with your desired aesthetic is the ultimate goal. Remember, a well-chosen privacy screen does more than provide seclusion; it enriches the atmosphere of your home. Whether you’re delineating a workspace from a lounge area or simply seeking a restful retreat from urban day-to-day, your screen should serve your lifestyle needs.
To further inspire your creativity in rental spaces, explore how other temporary solutions, like command hooks, can complement your privacy screen setup. These insights might unlock new ways to integrate your screen within your overall decor, leading to a cohesive and captivating living space.
Step-by-Step Guide: Crafting Your DIY Privacy Screen
Creating a DIY privacy screen can be the perfect project to transform your rental space. Whether for savvy urban dwellers or those nestled in quieter corners, a fabric panel screen can define and refine your living area.
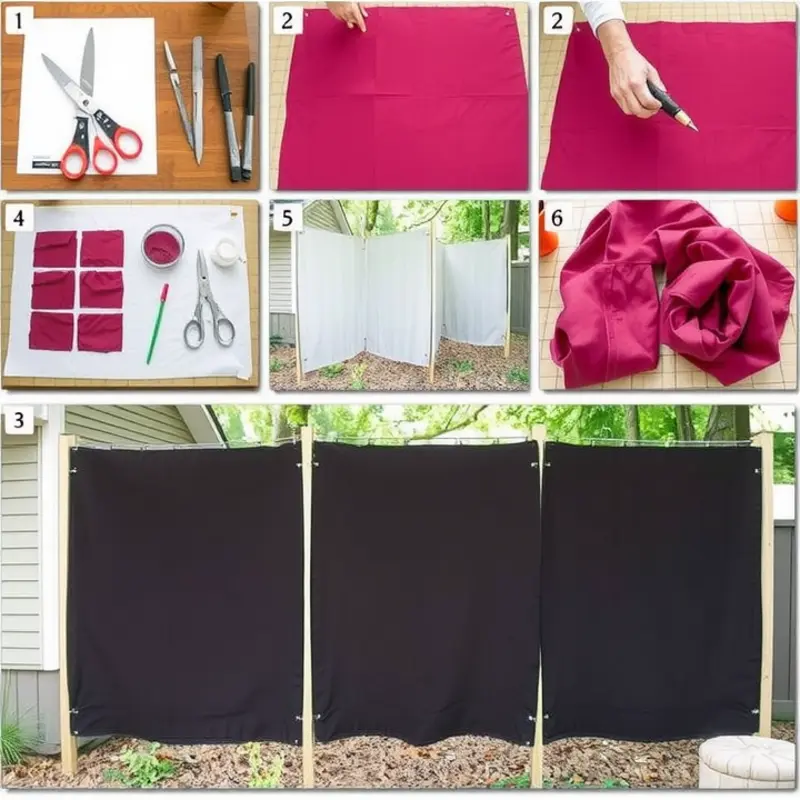
First, gathering the right materials is crucial for a successful project. Opt for fabrics that match your aesthetic and needs, be it sheer for light play, bold patterns for a statement, or solid colors for simplicity. You’ll also need either a curtain rod or dowel, accompanying rings or clips, a trusty measuring tape, scissors, and possibly a drill if your installation demands it.
Once your materials are ready, it’s time to measure and cut your fabric. Measure the exact width and height of the area you wish to cover. Add an extra inch on each side to accommodate hems. This allowance ensures a neat finish, preventing the screen from looking improvised.
With the fabric prepared, hem those edges. Fold each edge over by half an inch, ironing them down to create a crisp line. Then, sew or use a strong adhesive hem tape for a lasting edge finish. This step is vital not just for aesthetics, but for the fabric’s longevity.
Next, focus on attaching rings or clips. These small additions will carry your fabric, so affix them securely. Even spacing is key here; place them equidistant at the top edge of your hemmed fabric. Clips can provide flexibility as they allow for easy removal or adjustment.
Before hanging your creation, ensure the installation of the rod or dowel is secure. A curtain rod works well in most scenarios and is usually easy to install, needing just a few screws into wall anchors. If a dowel fits your scheme, you might need to craft or purchase brackets to hold it. Using minimal intrusion methods like removable adhesive strips can be ideal for rentals where permanent modifications aren’t allowed. Explore more removable options in this guide.
Finally, it’s time to hang your screen. Slide the rings onto the rod or attach them to the dowel’s brackets. This step brings your creation to life, unveiling both privacy and a touch of personal style.
With this project completed, your rental becomes more than just a residence. It begins to reflect your personality and needs, all while respecting the temporary nature of your living situation. As you sit back and enjoy your unique screen, consider how else you might personalize your space with similar, simple projects that enhance both privacy and style.
Final words
Creating your own privacy screen is a fulfilling project that can make any rental feel like home. By blending functionality with personal style, these DIY screens enhance both comfort and creativity in your living space. Whether you opt for a vibrant fabric panel or a chic wooden divider, the results not only offer privacy but also add a unique touch to your decor. So unleash your creativity amidst your daily routine and embark on your DIY journey, turning your rental into a sanctuary of relaxation and inspiration. Your new privacy screen is waiting to bring your vision to life!


