
Making a rental feel like home can be a challenge, especially when it comes to putting your unique stamp on your living space. Enter the DIY removable picture ledge—a perfect solution for renters, young professionals, students, and families who want to showcase their favorite memories and art without the need for permanent fixtures or repairs. This simple yet stylish idea allows you to personalize your walls without sacrificing your security deposit or landlord approval. Moreover, it’s an opportunity to unleash your creativity! With minimal tools and an afternoon of your time, you can create a stunning display that reflects your personality and style. Let’s explore how you can build your own removable picture ledge, along with some inspiring ideas to get you started.
Gathering Your Materials and Tools
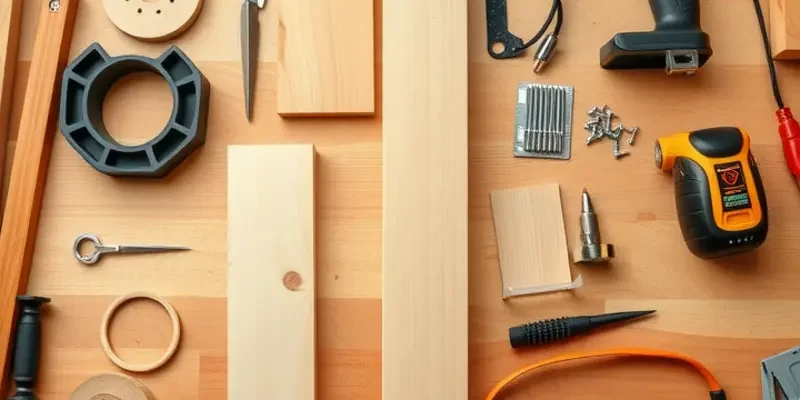
Before starting on your stylish removable picture ledge, it’s crucial to gather materials and tools you’ll need. Collecting everything beforehand ensures a smooth workflow and eliminates interruptions.
Materials List
-
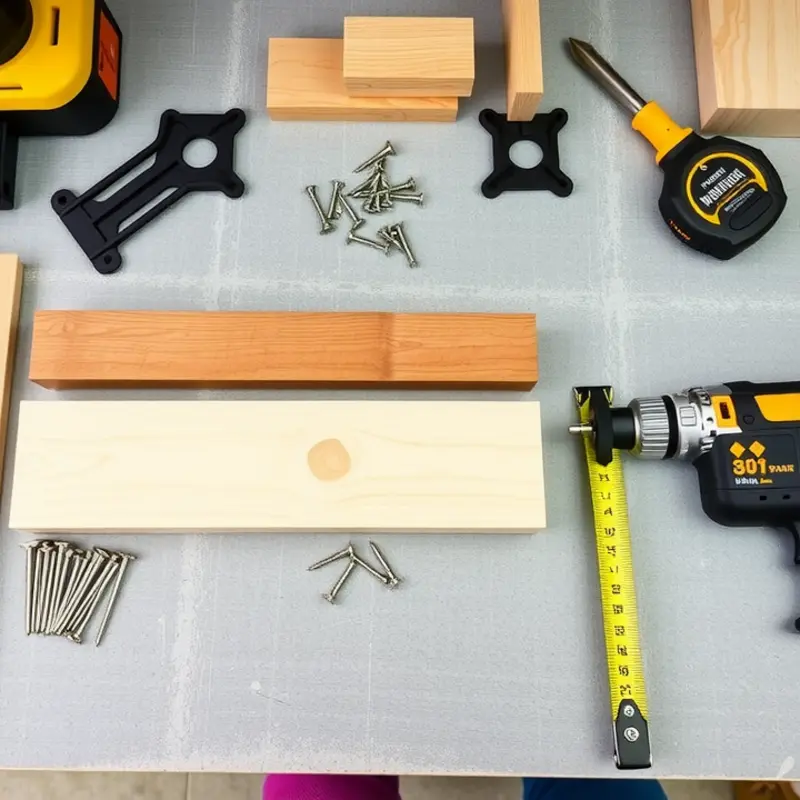
Wooden Boards: Select lightweight wooden boards for the ledge. They should be sturdy yet easy to handle. Depending on your preference, get boards that are about 4 to 6 inches wide.
-
Removable Adhesive Strips: Since the ledge is temporary, use adhesive strips that won’t damage walls. Opt for strips designed to support the weight of the ledge plus the pictures you’ll display.
-
Sanding Paper: Choose fine-grit sandpaper for smoothing the edges and surfaces of the boards. This step ensures a polished look and prevents splinters.
-
Wood Finish or Paint: Decide whether you want to paint or stain your ledge. A wood finish emphasizes natural grains, while paint offers various color options to match your decor.
-
Protective Sealant: If using a stain, follow up with a sealant. This final touch will protect the wood and enhance its durability.
-
Level: This tool helps mount the ledge straight on the wall. A leveled ledge ensures that displayed pictures align perfectly.
-
Measuring Tape: Accurate measurements are essential to ensure your ledge fits your space perfectly.
-
Cleaning Cloth: Wipe down your boards after sanding to remove any dust or particles before painting or sealing.
Tools Required
-
Saw: If the boards need resizing, use a saw. A hand saw or even a miter saw can work well, depending on your comfort level and space availability.
-
Paintbrushes or Rollers: Choose the right brush size for painting or staining your boards. Foam brushes can also provide a smooth finish for sealants or paints.
-
Safety Gear: Protect your eyes and hands while working. Safety goggles and gloves are essential, especially if you’re sawing or sanding.
These materials and tools will set a solid foundation for your project. As you plan, consider the interplay between aesthetics and functionality. Explore renter-friendly decor tips that can further inspire your project. Doing so will enhance the visual appeal of your ledge and the personalization of your rental space.
With everything assembled, the next step will guide you through the building and installation process. Stay organized and take your time with each step to avoid mistakes, ensuring a beautiful final product.
Crafting and Installing Your Picture Ledge
With your materials assembled, you’re ready to bring your picture ledge to life. If you’ve never done any woodworking before, don’t worry. This project is perfect for beginners and requires nothing more than basic tools and a bit of patience.
Start by measuring the length of the ledge you wish to create. Standard lengths range between 24 to 48 inches, but customizing your size can help you perfectly fit your space. Use a pencil and tape measure to mark out these dimensions on your piece of wood.
Next, you’ll want to prepare your saw to cut the board to the desired length. If you’re cutting indoors, ensure flooring and surrounding areas are protected from sawdust. Once cut, sand down the edges and surfaces of your wood piece. This step is crucial, as it ensures a smooth finish and reduces the risk of splinters.
After sanding, decide on the depth of your ledge. A depth of about 4 inches will allow enough space for frames without making the ledge too bulky. Cut another piece of wood for this section, ensuring it matches the chosen length.
To create the lip of your ledge, which ensures the frames stay in place without slipping off, you’ll need a third piece of wood. This piece should be around an inch wide and match the length of your primary ledge piece. Sand it thoroughly to remove any rough areas.
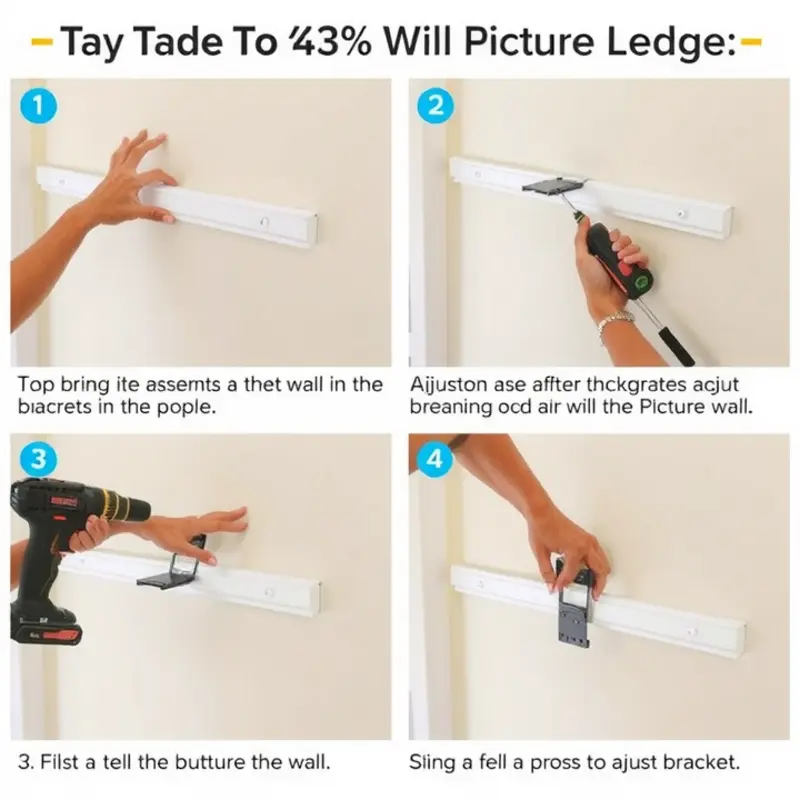
Now, arrange the three pieces into a “U” shape on the floor. Attach them using a strong adhesive suitable for wood or small screws. If using screws, pre-drill holes to avoid splitting the wood, and counter-sink them to maintain a sleek appearance.
Finishing the surface is essential, both for aesthetic purposes and to protect the wood. Choose a stain or paint color that complements your room’s decor. Apply it in thin, even coats, allowing ample drying time between applications. Ensure you’ve adequately ventilated your space if working indoors.
With the ledge prepared and finished, you’re ready for installation. Since this project is renter-friendly, use removable adhesive strips or hooks rated for the weight of your ledge. Follow the manufacturer’s instructions carefully to avoid wall damage.
If you’re uncertain about how to adhere the ledge effectively without causing damage, you may consider checking this guide on renter-safe kitchen hooks for more tips.
Securely mount the ledge to the wall at the desired height. Remember, placement is key for achieving a stylish look. Consider hanging it at eye level for practical and visual appeal.
Before adding your frames or artwork, ensure the ledge is level. Use a spirit level for accuracy. Once you’re satisfied, begin arranging your frames, mixing different sizes and styles for a dynamic display. Rotate pieces occasionally to keep the look fresh and engaging.
Congratulations! Your stylish removable picture ledge is now complete, opening new avenues for personalizing your rental space in a chic and functional manner.
Final words
Creating a DIY removable picture ledge not only provides a practical way to display your favorite images and art; it also allows you to express your unique style in your rental space. By following the steps outlined above, anyone—from students to families—can easily construct and personalize a picture ledge that suits their decor and needs. Remember, the best part of this project is that it’s completely removable, so you can rearrange and refresh your display whenever inspiration strikes. Get started today, and watch your walls come alive with personality!


