
Renting a home often means compromising on style, especially when it comes to flooring. However, with the rising popularity of DIY projects, it’s becoming easier for creative renters, young professionals, students, and families to add a personal touch to their living spaces. Removable vinyl flooring offers a versatile, affordable, and aesthetically pleasing option to transform a plain room into a stylish oasis. These peel-and-stick tiles come in a plethora of designs and colors, allowing you to express your individuality without making permanent changes. This guide navigates through the essentials of selecting, installing, and maintaining removable vinyl flooring, ensuring you can achieve a stunning look that reflects your personal taste. Whether you’re aiming for a cozy atmosphere in a student apartment or creating a fun space for your family, discover how this innovative flooring solution can elevate your home while keeping your security deposit intact.
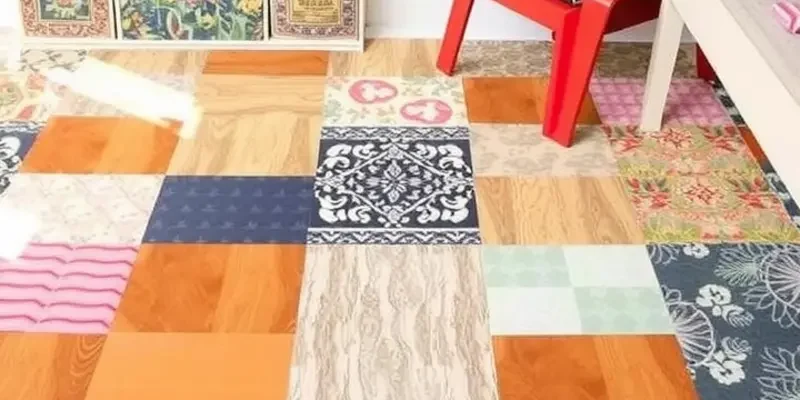
Getting Started: Choosing the Right Vinyl Flooring
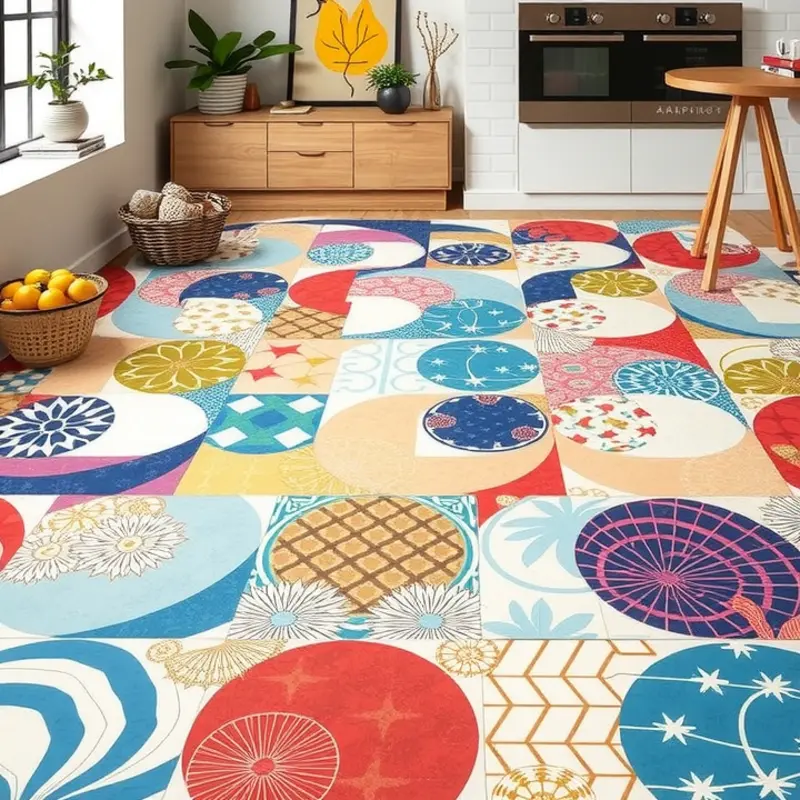
Removable vinyl flooring offers a fantastic way to personalize your rental without making permanent changes. Choosing the right option involves understanding various styles, materials, and practical considerations. This guide will walk you through the essentials to help make an informed decision.
First, consider the style of vinyl flooring. Vinyl flooring comes in numerous designs, from wood and stone replicas to abstract patterns that can bring a unique flair. Wood-look vinyl provides a warm, classic aesthetic reminiscent of oak, pine, or walnut. Stone-look options such as marble or slate exude elegance and can give a room a luxurious feel. For rental spaces aiming for modernity, geometric or patterned vinyl can be eye-catching and contemporary.
Apart from style, the material composition is crucial for durability and comfort. Make sure to look for vinyl flooring with a thick wear layer, as this will withstand high traffic and reduce the chance of damage. For multi-purpose rooms, waterproof vinyl plank flooring is an excellent choice, especially for bathrooms or kitchens where moisture is an issue. Sound absorption is another factor to consider for apartments. Choosing vinyl with noise dampening properties can help mitigate sounds, enhancing not just your comfort but also your neighbors’.
Another important factor when choosing removable vinyl flooring is ease of installation. Peel-and-stick and click-lock planks are popular options for DIY enthusiasts. They don’t require professional tools, making installation straightforward. However, not all subfloors are suitable for these types; make sure your existing floor surface is clean and level for the best results.
Maintenance and disposal are also worth considering. Vinyl flooring is generally low maintenance. Regular sweeping and occasional mopping keep it looking great. Some brands offer eco-friendly choices that are just as easy to remove when your lease ends, ensuring you leave the space as you found it.
Budget is always an important part of the decision-making process. Vinyl flooring is generally more affordable than traditional options like hardwood or tile, but prices can vary based on appearance, thickness, and brand. Decide how much you’re willing to invest, and remember that a slightly higher upfront cost can mean better durability and longevity.
If noise reduction is a concern, you may want to explore tips on reducing noise in your apartment. This can help ensure your new flooring doesn’t affect the sound quality in your home.
Embarking on the journey to select and install vinyl flooring in your rental is a fun and rewarding process. With the right design, material, and installation method, you can transform your space into a personalized haven that truly feels like home.
Installing Your New Floor: Step-by-Step Guide
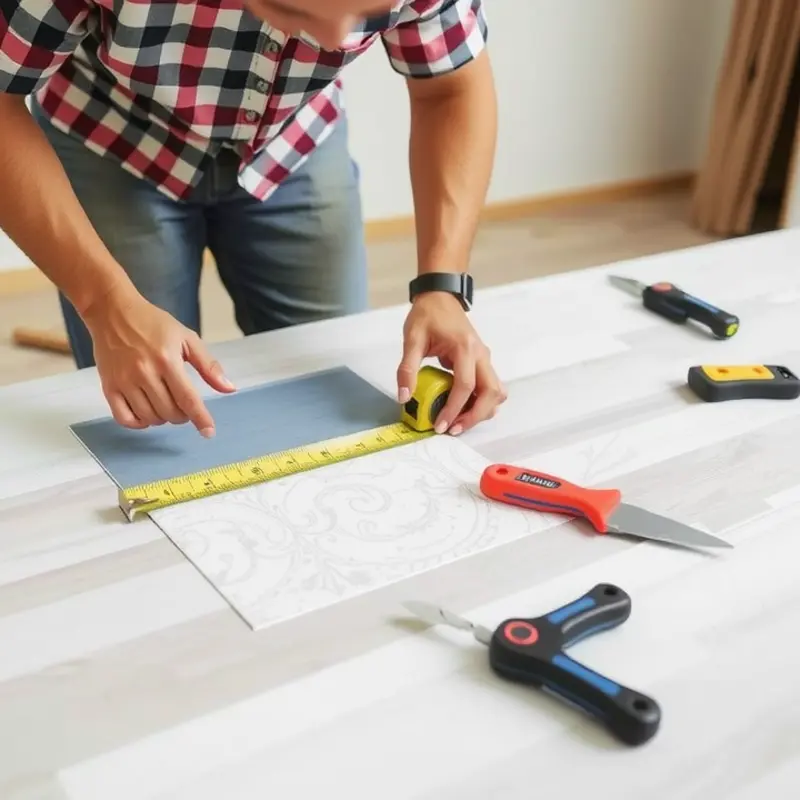
Transforming your rental space with removable vinyl flooring is not only a stylish upgrade but also an accessible DIY project. With a few simple tools and an eye for precision, you’ll achieve a seamless and personal touch. Here’s a comprehensive guide to ensure you get the job done right, from preparation to the final placement.
Begin by preparing the floor. Remove any existing carpeting, rugs, or furniture in the area where you plan to install your vinyl tiles. Clean the floor thoroughly using a pH-neutral cleaner to ensure no dirt or grime compromises the adhesive’s effectiveness. Pay special attention to removing any uneven surfaces, as bumps can lead to an unsatisfactory finish.
Next, measure your space accurately. Use a tape measure to determine the length and width of the room and calculate the total square footage. It’s wise to purchase an additional 5-10% of vinyl tiles to account for mistakes or future repairs. When measuring, consider the direction you intend to lay the tiles, as the pattern direction can impact the final aesthetic.
Once you’ve gathered your materials, including a utility knife and a straight edge, it’s time to cut the tiles to fit your space. Utilize a utility knife to gently score the top of the tile. Bend it back to snap apart cleanly along the scored line. For intricate areas around doorways or fixtures, create templates using paper before cutting the tiles to match these designs.
Lay out your tiles, starting from the center of the room. This approach helps evenly distribute the tiles and creates a balanced look, especially if your space isn’t a perfect rectangle. Use a chalk line to establish a straight reference and move outward from this line. Remove the backing from the self-adhesive tiles as you lay them, pressing firmly to secure each one in place.
As you continue, ensure proper alignment by frequently checking your chalk lines. Gently press and rub the tiles into the floor to remove air bubbles, which can interfere with the adhesive bond. A rolling pin or similar cylindrical object can help smooth these surfaces and enhance adhesion.
Finally, trimming tiles along the walls to fit might require more precision. Use your utility knife and straight edge to achieve a snug fit, ensuring no gaps mar the perimeter. Seal the edges with a clear vinyl seam sealer for additional security, especially near moisture-prone areas such as kitchens or bathrooms.
With all tiles in place, give your new floor a final inspection. Adjust any misaligned sections promptly to ensure your floor’s durability and visual appeal. Once complete, your revitalized space not only adds personality but also newfound comfort and style to your rental.
For additional tips on maintaining and enhancing your living space, consider visiting this page on DIY apartment storage ottomans, complementing your stylish new floor with functional furniture.
Final words
DIY removable vinyl flooring presents an exciting opportunity for renters to inject their personality into their living environments. With countless designs available, you can creatively express yourself while maintaining the integrity of your rental agreement. From selecting the perfect tiles to following easy installation steps, your space can reflect your unique style in no time. Remember, the right updates can make your rental feel like home without the worry of hefty security deposit losses. Embrace the creativity and convenience of removable vinyl flooring, and let your imagination run wild in your rental home.


