
Creating a cozy and stylish bedroom in a rental apartment can be challenging, especially when you want to showcase your personal taste without making permanent changes. Fortunately, DIY headboards offer a unique opportunity to add character to your space while being renter-friendly and budget-conscious. Whether you’re a young professional looking to elevate your style, a student seeking to make a small room feel more homey, or a busy family wanting to inject some fun into your home, headboards can easily and affordably transform your space. In this guide, we’ll explore two distinct chapters featuring creative, personalized headboard ideas that you can craft without putting down roots in your rental. Let’s unleash your inner designer, showcasing thought-provoking concepts followed by simple, clear instructions that make DIY fun and accessible. It’s time to bring color, personality, and comfort into your space!
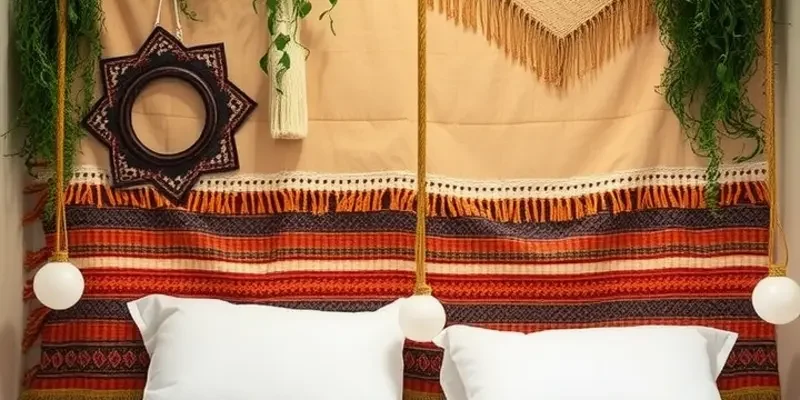
Boho Chic Fabric Headboard
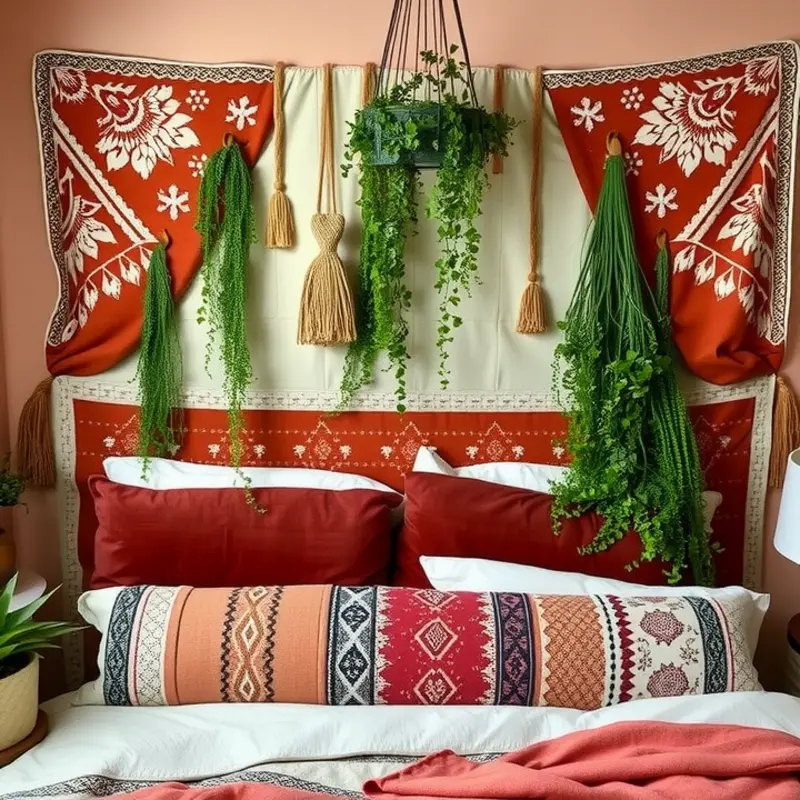
Creating a Boho Chic fabric headboard can transform your bedroom into a space that exudes both elegance and calm. The first step in this simple DIY project is selecting the right fabric. Look for materials like linen, cotton, or a soft tapestry that enhance the bohemian aesthetic. Patterns such as paisleys, geometric shapes, or muted florals can add personality without being overwhelming. Aim for colors that complement your existing bedroom palette, ensuring coherence.
Once you’ve selected your fabric, you’ll need a sturdy backing material to serve as the frame. Plywood is an excellent choice due to its combination of strength and light weight, ensuring it can support the fabric while remaining easy to handle. Cut the plywood to your desired dimensions, considering both the width of your bed and the desired height of the headboard.
Next, attach the fabric to the plywood. Lay your fabric face down on a clean surface, placing the plywood on top. Allow for several extra inches of fabric around each edge to wrap and staple to the back. Pull the fabric taut to avoid any creases and begin stapling one side, working your way around. Ensure each staple is firm, paying extra attention to the corners for a polished finish.
With the fabric securely in place, it’s time to consider how to attach the headboard. Velcro strips or removable adhesive hooks provide a renter-friendly solution that won’t damage your walls. Affix these to both the back of the headboard and the desired location on the wall. This approach not only ensures stability but also makes it easy to remove or reposition the headboard as needed.
To add an extra layer of Bohemian charm, consider embellishing your headboard with decorative elements like tassels or macramé hangings. These can be easily draped or pinned and offer additional texture and depth.
Finally, enhance the overall ambience by incorporating complementary decor such as throw pillows or a lightweight quilt in similar fabrics or patterns. This cohesive style can create a peaceful bedroom retreat that feels personalized and inviting.
Remember, the goal in creating a Boho Chic fabric headboard is to reflect your style while staying conscious of rental limitations. With creativity and careful selection of materials, this DIY project transforms your bedroom into an eye-catching haven without permanent alterations. For more ideas on how to personalize your rented space, explore various guides on apartment-friendly decor solutions.
Upcycled Pallet Headboard
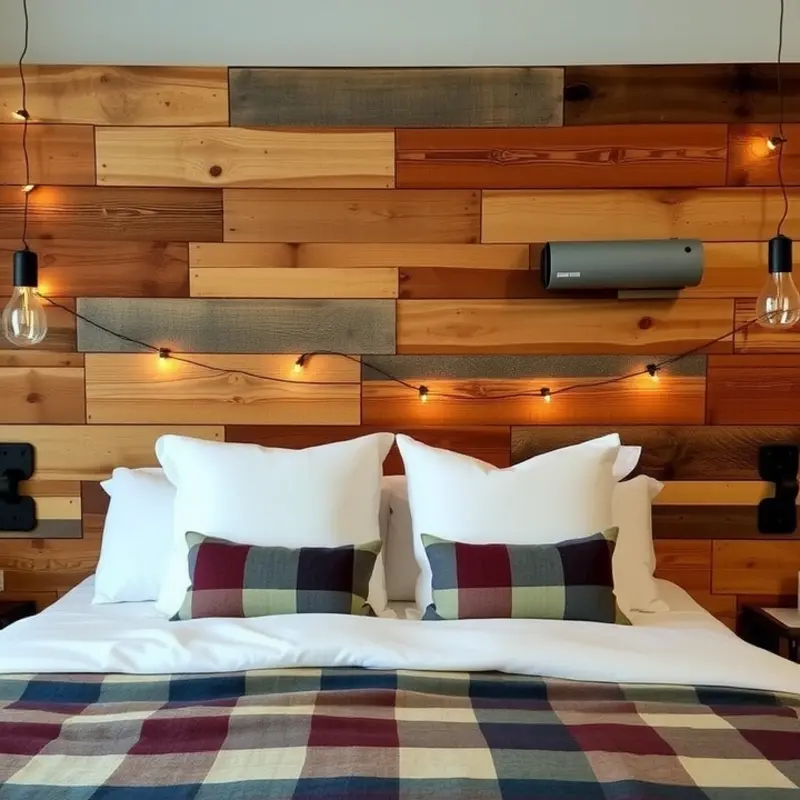
Give new life to your bedroom by revamping otherwise discarded wooden pallets into a stunning headboard. This project not only speaks volumes about eco-friendliness but also aligns perfectly with budget-conscious decorators searching for a bit of rustic charm. All you need is a little time, creativity, and minimal tools in your DIY arsenal.
The first step is safely disassembling the pallets. This can often be the trickiest part and should be done with care. Use a crowbar designed for heavy-duty prying, and start by carefully removing the nails that hold each slat in place. This prevents splitting the wood, preserving the integrity and rustic appeal of the pallets. For a safer, nail-free approach, try using a reciprocating saw to cut through the nails, keeping the wood intact.
Once you’ve disassembled the pallets, it’s time to sand. Sanding will not only smooth any rough edges but also enhance the wood’s natural grains. Begin with a coarse grit sandpaper, around 60 to 80 grit, to remove surface inconsistencies. Gradually move to finer grit papers for a smooth finish. Pay special attention to any jagged areas that could catch on bedding or clothing.
Customization is where your pallet headboard truly comes to life. Consider staining the wood for a dark, rich finish or painting it to complement your existing decor. If you favor a more natural look, a clear sealant will protect the wood while maintaining its original hue. This is a crucial step to ensure durability and longevity, especially if your headboard will be close to your bed’s head, where wear and tear can occur.
Think about the final assembly — positioning the slats horizontally gives a streamlined effect, while vertical alignment can add height and a certain grandeur. Securely attaching the slats to a base of your making will ensure stability. Use wood glue for an additional hold before screwing them into place. Be mindful of the weight and ensure your bed frame can support your new headboard without risk of tipping.
Finally, the installation stage! Since you’re likely renting, avoid wall mounting to protect your security deposit. Instead, affix the headboard to the bed frame itself, using brackets designed for easy modification. This way, you can faithfully follow the lease guidelines as outlined in this helpful guide to renter-friendly renovations.
By following these steps, you’ll transform simple wooden pallets into a chic, custom headboard that showcases your personal style and commitment to sustainability. This piece won’t just elevate your space — it will also provide a talking point for guests and a source of daily inspiration in your stylish sanctuary.
Final words
DIY headboards not only serve as practical solutions but also as artistic expressions of your style. From the bohemian fabric headboard to the rustic pallet creation, these projects encourage creativity while being affordable and easy to execute. With each step, you can develop a beautiful focal point in your rental home that speaks to who you are, all without sacrificing your security deposit! Personalizing your space has never been more accessible and enjoyable. So gather your materials, roll up your sleeves, and let your creativity shine. Your dream bedroom awaits!


