
Creating a unique living space can feel daunting, especially for renters who can’t make permanent changes. Ottomans serve as versatile pieces of furniture that can enhance any room’s aesthetic while providing extra seating or storage. The best part? You don’t have to break the bank or worry about your security deposit! Crafting your own DIY ottomans allows you to express your creativity, match your decor, and make your place feel more like home. Whether you’re a student looking for affordable solutions, a young professional aiming to add some flair, or a family striving for functionality and style, there’s an ottoman idea perfect for you. From repurposing materials to customizing store-bought items, this guide provides you with two imaginative chapters filled with inspiration and step-by-step instructions to create the ottoman of your dreams—without any hassle. Get ready to roll up your sleeves and dive into the world of DIY ottoman projects that are sure to impress!
Upcycled Stools to Cozy Ottomans
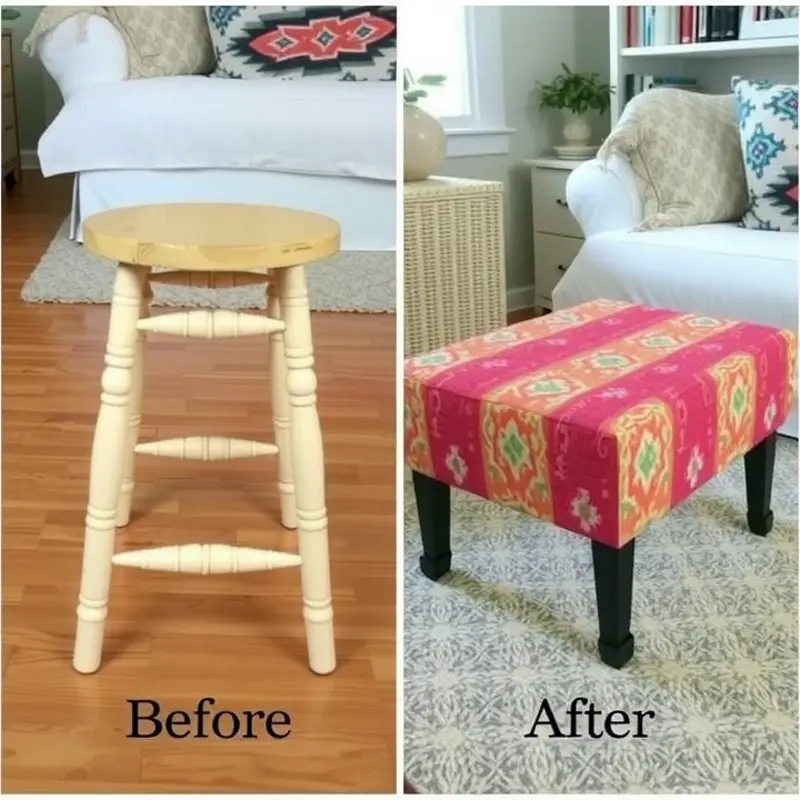
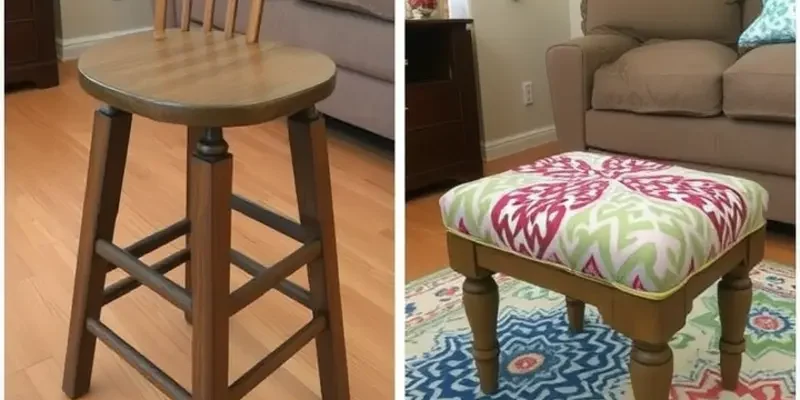
Transforming old stools into cozy, fabric-covered ottomans is a fantastic way to personalize your rental space. With some creativity and a few supplies, you can convert these pieces into stylish additions to your home. Here are some steps and tips to guide you through the process.
Materials Needed:
- Old wooden stools
- Foam padding
- Fabric of choice
- Staple gun and staples
- Scissors
- Fabric glue (optional)
- Measuring tape
- Screwdriver (if disassembling stool)
Once you gather these materials, you’re ready to embark on your ottoman transformation. Start by measuring your stool to determine how much foam and fabric you’ll need. It’s crucial to allow for a few extra inches of fabric to cover the height of the stools and overlap underneath.
Step 1: Prepare Your Stool
If your stool is in parts or can be disassembled, it might be easier to work with. Use the screwdriver to separate different pieces. This allows you to cover each part seamlessly. Ensure that the wooden surface is clean and free from any old paint or rough edges to avoid damaging your fabric.
Step 2: Add Comfort with Foam Padding
Cut the foam padding to match the seat of your stool plus a bit of overhang. This padding is what adds comfort to your new ottoman. Use a thick foam for a plush experience or thinner padding for a more refined look. Adhere the foam to the seat with fabric glue or a spray adhesive. Allow it to dry completely before moving to the next step.
Step 3: Fabric Selection and Cutting
Selecting the right fabric is key to integrating the ottoman into your existing decor. Choose a durable fabric for longevity. Patterns can add flair, while neutral colors often provide versatility. Cut your fabric carefully, ensuring it covers the foam and the underside of the stool by about two inches.
Step 4: Secure the Fabric
Place the fabric over the foam-covered seat and begin stapling underneath. Start from the center of one side, pulling snugly, and work your way around. Use the staple gun to secure the fabric every two inches for a neat and taut finish. For rounded or unusual shapes, make small incisions in the fabric where necessary, tucking and folding to maintain a smooth surface.
Step 5: Reassemble and Final Touches
If you dismantled your stool, carefully put it back together, ensuring all screws are firmly tightened. For added durability, you might consider small fabric glue applications on high-stress areas.
Voilà! Your upcycled stool turned into a chic ottoman is now ready to enhance your space. This project not only adds functionality but also enhances the aesthetic appeal of your living area. For additional DIY decor ideas, consider browsing DIY renter-safe drawer liners. With these creative touches, personalizing your rental space becomes both fun and fulfilling.
Storage Ottoman with a Twist
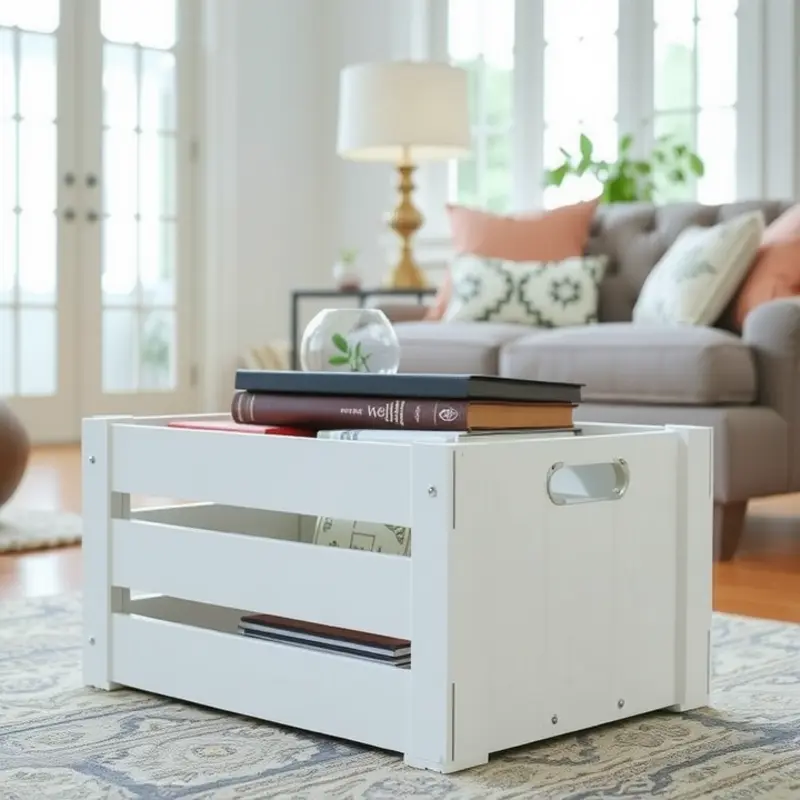
Create a chic and functional storage ottoman with surprisingly few materials. This project combines practicality with style, offering a solution for clutter while serving as a stylish centerpiece in your living space.
Start by selecting a sturdy container that will serve as the base of your ottoman. A strong wooden crate or a vintage trunk can provide enough space for storage while ensuring durability. Ensure the container’s height aligns with typical ottoman dimensions for optimal comfort.
Next, gather materials to construct a padded lid. You’ll need a piece of wood cut to fit over the container’s opening, upholstery foam, fabric of your choice, and a staple gun. The foam should be about two inches thick for adequate cushioning. Secure the fabric tightly over the foam and wood, ensuring a smooth, taut surface. Use the staple gun to attach the fabric on the underside, maintaining tension to avoid wrinkles.
For added versatility, consider attaching four casters to the bottom corners of the container. This allows easy movement of your ottoman, making it a flexible addition to any room. Ensure that the casters can be locked in place to prevent unwanted rolling, maintaining safety and stability.
Personalize your ottoman by painting or staining the exterior. Choose a finish that complements your existing decor to enhance the sense of cohesion in your space. For extra flair, add decorative elements like nailhead trim or embroidered designs.
Enhance the usability by compartmentalizing the inside of the ottoman. Using dividers or baskets, you can create sections to organize different types of items. This added functionality will keep your living area tidy and uncluttered, with easy access to blankets, magazines, or remote controls.
This project perfectly combines aesthetics with practicality, making it ideal for renters looking to maximize small spaces without sacrificing style. Plus, leveraging existing materials keeps the project affordable and adaptable.
For additional DIY ideas that enhance your apartment living experience, check out this guide on DIY apartment-friendly towel racks.
Final words
DIY projects, like crafting stunning ottomans, are a delightful way to express your personal style in a rental space. Not only do these projects add functionality—providing extra seating or hidden storage—but they also allow you to showcase your creativity. The transformation of ordinary items into extraordinary furniture pieces makes for a unique living environment. Whether you choose to upcycle a stool or build a storage ottoman, the possibilities are endless, and the results are always rewarding. Dive into these projects and watch your rental home become a reflection of you—affordable, stylish, and utterly welcoming!


