
When it comes to decorating rental spaces, many renters feel limited by strict leases and rules against permanent modifications. However, you can easily and affordably enhance your living environment using renter-safe decorative molding. This guide explores creative techniques tailored to young professionals, students, families, and anyone eager to infuse their personality into their homes without damaging walls or breaking the bank. Whether your style leans toward modern sophistication or vintage charm, incorporating molding allows for a beautiful update to any room. The best part? These projects are simple and can be accomplished in a weekend, offering an instant facelift to your walls and making your rental feel uniquely yours. Venture into the world of DIY decorative molding and discover how a few details can profoundly impact your everyday sanctuary.
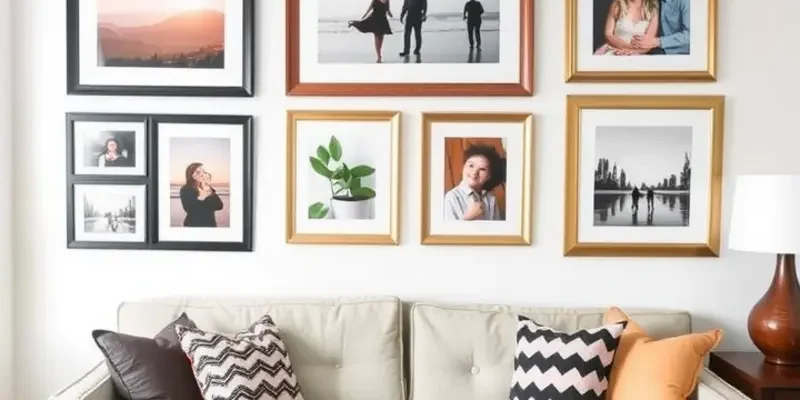
Creating a Molded Gallery Wall
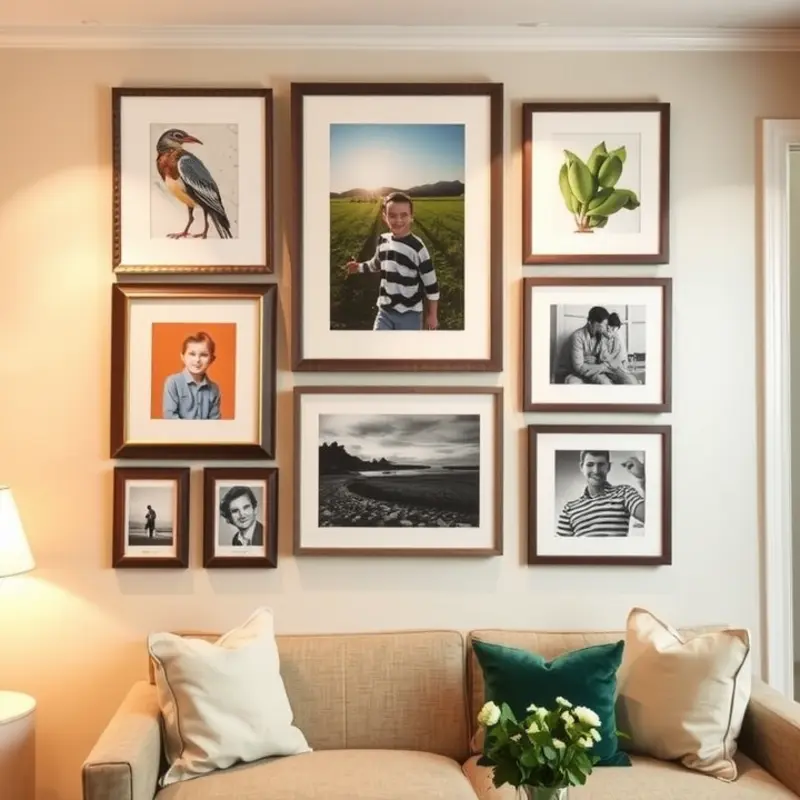
Decorative molding is an elegant way to transform any dull wall into a personal gallery that radiates style and sophistication. A gallery wall not only showcases your favorite art pieces and photographs but also creates an eye-catching focal point in your living space.
To get started, choose a wall that you’d like to transform. Consider the room’s layout and lighting to ensure your gallery receives attention. You’ll want to select a wall that can naturally draw the eye without overwhelming other design elements.
Start by measuring the wall to determine how much space you have. Before fixing the molding, plan the layout of your photos and artwork. Use painter’s tape to outline the frames on the wall. This simple trick helps visualize placement and adjust the arrangement without committing prematurely.
Consider float-mounted frames for a chic and contemporary look, or select ornate frames for a more traditional feel. Mixing frame sizes adds visual interest. Opt for a mix of small, medium, and large frames to create a pleasing balance.
When selecting pictures, aim for a cohesive theme or color scheme. This choice ties the gallery wall together harmoniously, providing an intentional design. Personal photos, art prints, and even fabric swatches can create a delightful mix.
Next, choose your molding style. There are various renter-safe options, such as lightweight, removable molding strips. These products are easy to install and ideal for apartments since they won’t damage walls. To affix them securely, use adhesive strips instead of nails or screws.
Cut the molding to size using a handsaw, ensuring each piece fits perfectly with your frame blueprints. Miter saws, available in most hardware rental stores, will help achieve the perfect angles for a professional finish.
Install the molding directly on the wall outlines made with painter’s tape earlier. This helps ensure the molding frames your gallery with precision. Periodically step back to view your progress from afar, ensuring alignment and spacing remain balanced.
Accent lighting can elevate your gallery wall further. Use adjustable picture lights or strategically placed floor lamps to highlight specific pieces. For more lighting tips and ideas, visit apartment lighting hacks.
Once you’ve set up the molding, carefully hang your frames. Use picture hanging strips for a damage-free solution in rentals. Step back once more to ensure everything is cohesive. Allow each piece its own space while fitting into the overall pattern.
The final gallery wall should reflect your personal style and memories, making your rental feel more like a home. By creating a customized and stunning display, you showcase not only your decorative skills but also the uniqueness of you and your space.
Experimenting with molding and various layouts turns design into an exciting personal project. Let your creative imagination guide you as you craft a space that truly speaks to who you are.
Adding Elegance with Base and Crown Molding
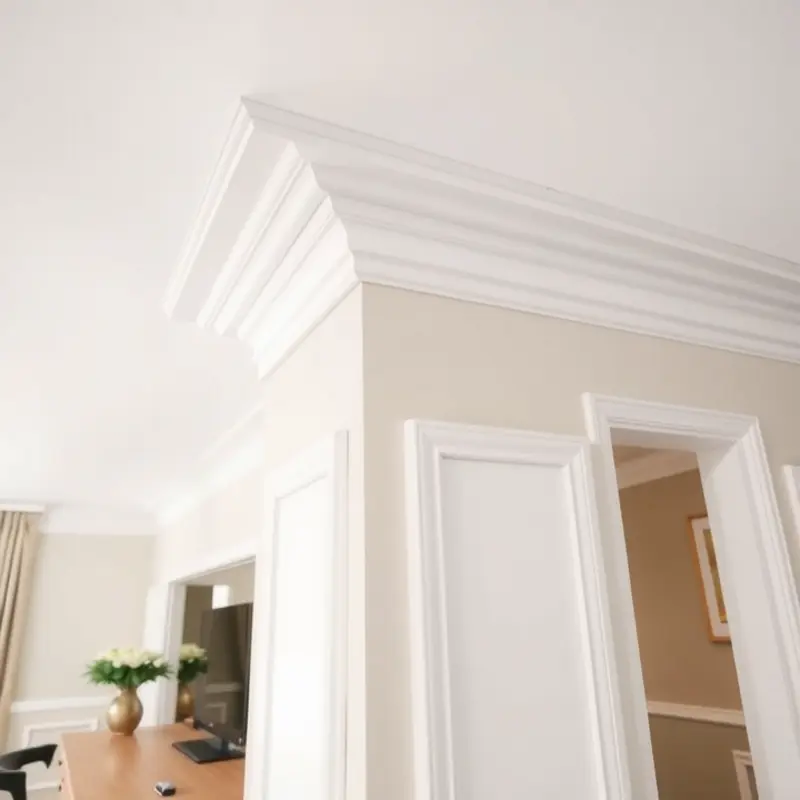
Elevating the ambiance of your rental with base and crown molding can be surprisingly simple and renter-friendly. These decorative features enhance the architectural elegance of any space. By choosing the right materials and temporary adhesives, tenants can achieve sophistication without violating rental agreements.
Start by selecting lightweight materials such as foam or polyurethane molding. These are easier to handle and cut, making them ideal for a DIY project. Before purchasing, measure the perimeter of the rooms where you’ll be adding the molding. This ensures you procure enough material without extra costs.
Next, consider using peel-and-stick or non-permanent adhesives. These adhesives allow you to secure the molding without leaving lasting marks on the walls. To achieve a seamless look, start at one corner of the room and work your way around, pressing firmly to adhere the molding. If you make a mistake, these adhesives make it easy to reposition or remove the molding when your lease ends.
Crown Molding is typically used to draw the eye upward, adding height and grandeur. Place it where the walls meet the ceiling. Begin by marking where the molding should be placed, ensuring each strip connects seamlessly. A miter saw is excellent for cutting corners at precise angles, though a handsaw and miter box can also suffice for those on a tighter budget.
For Base Molding, install where the wall meets the floor. It serves as a visual anchor, grounding the room. Begin in a corner and attach the molding along the marked lines. If the flooring is uneven, use caulk or flexible adhesives to close gaps, ensuring a polished finish.
Developing a color palette that complements your existing decor can also enhance the effect of these additions. Consider painting the molding a color that contrasts with walls and ceilings for bold visual interest. Alternatively, match the molding to the walls for a more subtle, cohesive look.
Finally, remember to approach this project with patience and precision. Installation may take some time, but the outcome will transform your living space. If you need inspiration or additional DIY project ideas, check out this guide on small apartment coffee tables. Integrating various DIY elements can substantially increase the aesthetic value and personal feel of your rental.
By following these steps, you can inject elegance into your rental without compromising its temporary nature. This process not only enhances the environment but also provides a creative outlet to make the space truly your own.
Final words
Incorporating decorative molding into your rental space can significantly enhance its aesthetic without the fear of losing your security deposit. By creating a gallery wall or installing base and crown molding, you can tailor your rental home to reflect your unique style. These projects are not only cost-effective but can also be completed in just a weekend, giving you quick satisfaction and a fresh feel in your home. Don’t be afraid to explore your creativity and let your personality shine through in your living environment. With the right tools and a little DIY spirit, your rented space can be truly yours.


