
Renting doesn’t have to mean living in a cookie-cutter space. With a little creativity and some basic materials, you can personalize your rental home and make it feel uniquely yours. DIY wall pockets are an excellent way to add both functionality and flair without risking your security deposit. Perfect for creative renters, young professionals, students, or families, these wall pockets can help you utilize vertical space while keeping your essentials organized in style. Plus, they’re incredibly easy to make and can be customized to match your aesthetic, whether you want a minimalist Scandinavian look or a boho vibe. So roll up your sleeves, and let’s dive into some fantastic ideas that will breathe life into your walls without permanent changes to your rental property!
Chic Fabric Wall Pockets: A Cozy Touch
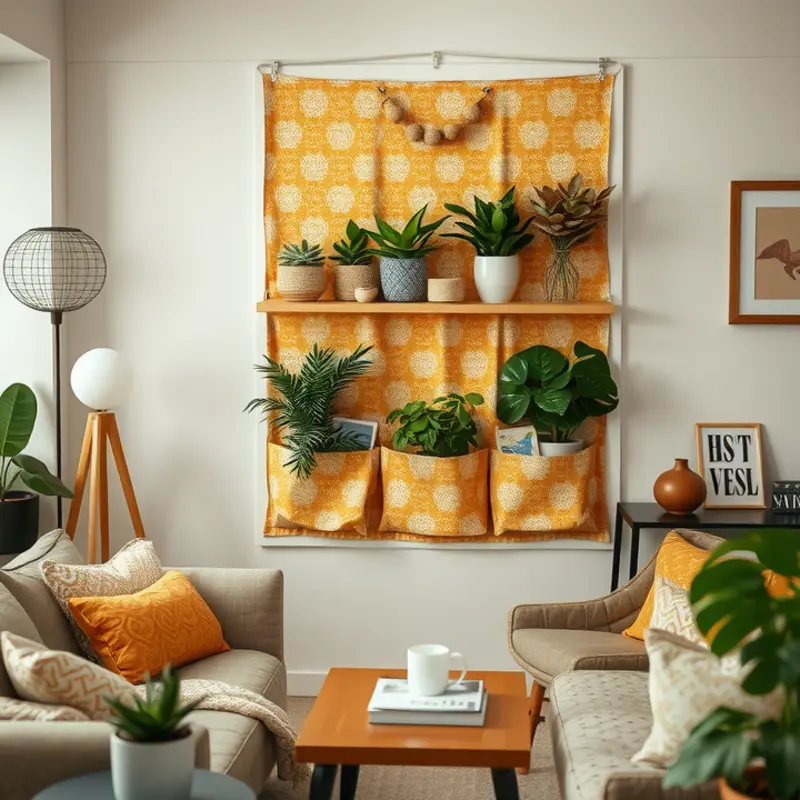
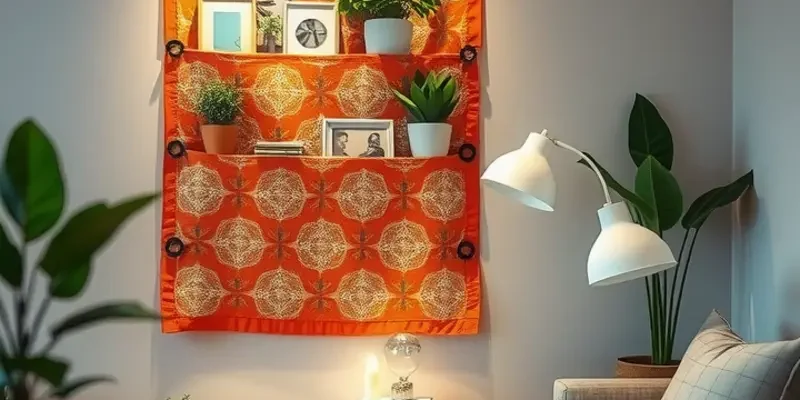
Transform your apartment with fabric wall pockets that strike the perfect balance between functionality and style. These DIY creations offer a personalized touch while being a practical storage solution. By using fabric, you can align the pockets with your current décor, whether you prefer bold prints or subtle textures.
To begin, gather your materials: your chosen fabric, scissors, fabric glue or a sewing kit, a ruler, and wall hooks or removable adhesive strips. Opt for fabric that is robust enough to hold your desired items but still easy to sew or glue. Cotton blends or canvas work well for this purpose.
Start by measuring the area where the wall pocket will hang. This will guide you in determining the size of each pocket. Once you’ve decided on the dimensions, cut your fabric into the necessary pieces. Each pocket needs a front piece, which will form the face of the pocket, and a back piece that attaches to your wall or base fabric.
If sewing, place the front and back pieces with the right sides facing each other. Sew along the sides and bottom edges, leaving the top edge open. Turn the pocket right-side out. Consider adding a lining for a sturdier finish, repeating the process with a slightly smaller fabric piece inserted into the pocket.
For a no-sew option, fabric glue is your ally. Secure the fabric edges with glue and press firmly until they are bonded. Allow adequate drying time based on the glue’s instructions. Using a fabric with minimal fraying will yield the best results with this method.
Mounting the pockets is straightforward. Position them on the wall using hooks or adhesive strips, ensuring they’re level and at a practical height. If you’re using them for heavier items, ensure your adhesive method can support the weight.
Get creative by experimenting with pocket arrangements. Mix and match different colors or patterns for visual interest. Alternatively, a monochrome palette can create a sleek, modern vibe. Personalize each pocket with decorative touches such as embroidery, iron-on patches, or small appliqués.
Fabric wall pockets can serve as a stylish home for your mail, keys, or even small potted plants. Moreover, their detachable nature makes them an excellent option for rentals where permanent fixtures are discouraged. Let your imagination guide you in turning these functional accessories into standout features.
For more creative and renter-friendly ideas, explore our renter-garment racks DIY guide to complement your crafted wall pockets. These projects offer endless possibilities to rejuvenate your living space effortlessly.
Rustic Wooden Wall Pockets: Go Natural
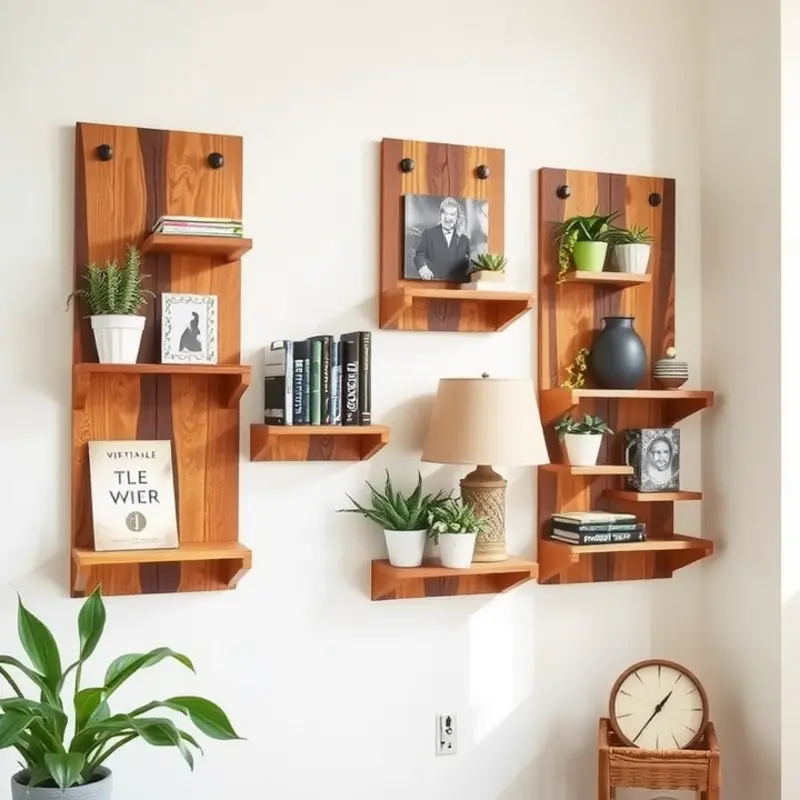
Unleashing your inner artisan with rustic wooden wall pockets can add a touch of natural elegance to any apartment. Using wooden crates or pallets, you can craft versatile storage solutions that reflect a warm, earthy charm.
Start by sourcing wooden crates or salvaging pallets from local markets or secondhand shops. Look for pieces with a sturdy build and minimal damage. Avoid using crates that are excessively damp or those with signs of infestation. A simple no-cost approach is asking local grocery stores if they have any spare crates from their shipments.
Once your materials are secured, it’s time to clean and prepare them. Use a stiff brush to remove any dirt or debris. Sand down rough edges to prevent splinters. This gives you a smooth base for subsequent steps. Choose sandpaper with a lower grit for an initial pass, then follow up with a finer grit to achieve a polished finish.
Painting or staining is where you can inject personality into your wooden pieces. If you’re aiming for a classic farmhouse look, consider using a whitewash paint. This allows some wood grain to show through, maintaining a rustic vibe. For a more vibrant space, opt for rich stains like walnut or cherry. Apply the paint or stain with a soft brush, following the wood grain for an even coat.
Styling your wooden wall pockets can drastically change their impact. If placed in the kitchen, these pockets are excellent for storing spices or small cooking accessories. Line them with mason jars for a coordinated culinary corner. In a bathroom, introduce a feeling of spa-like serenity by using the wall pockets to organize rolled-up towels and scented candles.
For easy installation, start by measuring and marking the wall where you plan to hang your pockets. Use a level to ensure straight and even placement, then install with wall anchors suitable for your wall type. Remember to secure each pocket adequately to prevent any potential safety hazards, especially if they will hold heavier items.
Integrating these pockets into your space doesn’t just provide functionality. They also contribute to a cozy and inviting atmosphere. Pair them with other natural elements like woven baskets or dried botanical décor for a harmonious theme.
For additional renter-friendly décor ideas, check out this DIY renter-safe coat stands guide. There, you’ll find more inspiration on how to embellish your home while keeping it lease-friendly.
Crafting rustic wooden wall pockets allows renters to enhance their dwelling with flair and minimal investment. With their adaptable nature and rustic aesthetic, they are a must-have for any renter looking to mix timeless style with practical storage.
Final words
DIY wall pockets are a versatile and accessible way to elevate your rental space without complicated renovations or permanent changes. Not only do they offer a practical storage solution, but they also allow you to express your unique style and creativity. Whether you choose to create cozy fabric pockets or opt for rustic wooden designs, the possibilities are endless. Take the time to personalize your home, making it a place where you can truly feel relaxed and inspired. So gather your materials, unleash your DIY spirit, and let those walls tell your story.


